Saturday, December 26, 2015

River ford


Another Christmas Day has come and gone. I hope everyone had a good time and got lots of nice gaming stuff. Boxing Day saw me noodling with a ford for the river sections.


As usual I began with a piece of clear acrylic. It's wider than a standard river section and I cut the corners off to meet the straight pieces, since I want to make it appear as a broader and shallower area of river where a ford might be found. The width would allow for slopes down from the road to the ford. (The trio of carol singers in the background are an ornament based on the gargoyles from Disney's Hunchback of Notre Dame movie. One of them lost a hand, which I glued back. I've spent a lot of time repairing small breakages in ornaments this year for some reason.)


For the next stage I glued strips of wood to stiffen the plastic and raise the level of the banks-to-be. I used ordinary epoxy adhesive for this, a dab of which went to fix the ornament's fist. The stretch of shallows that will mark the ford is sand sprinkled on Aleene's tacky glue mixed with a little water and spread over the plastic. Ordinarily this wouldn't stick to the plastic that well, but it's easy to work with and in this case it'll be sealed beneath the layer of Envirotex Lite varnish.

Next up, I applied spackle to the banks and spread it out and down to form the slopes to the fordable area.

A bit of ordinary acrylic craft paint for grass and mud. I usually do this painting stage after sealing the banks with Pledge mixed with a little brown paint, but since the fordable stretch would go under the varnish, I needed to do this now.


Final stage - the Envirotex Lite is poured on then spread to cover the river and fordable stretch. It's still wet right now, and the ford is more visible than the photo suggests. Once everything's dry, I'll remove the strips of tape from the ends and the ford'll be open for business.

This is really intended for 10mm figures, but will work just as well for larger scales. Next up I'll work on an N-scale bridge. I was thinking of making one that would fit on any stretch of river, but on further thought I'll make one with its own length of river. It'll look better that way. 

Thursday, December 24, 2015

Merry Christmas!


I'm off to make lunch then it'll be on to a spot of Christmas baking. A Merry Christmas to one and all!

Wednesday, December 23, 2015

River sections - third stage


With Christmas Day fast approaching I put on a spurt of modelling activity and finished the third stage of the river sections today. The last coat of Envirotex Lite varnish has been poured and the sections put aside to set.


Once all is dry it's on to the fourth and last stage - painting and flocking the banks. I plan to make a fordable section and a bridge, something like Hays Bridge in north Oxfordshire, which featured in the Battle of Cropredy Bridge.


There are still plenty of bridges like it still in service in the UK, so it'll do just fine for AVBCW too. I also have a couple of large-ish sheets of clear acrylic, which will make good ponds or small lakes, depending on scale.

At the moment I'm thinking it's high time I got a game or two on over the holiday week. The Barsetshire Regiment is still making its way through G'Wandaland, and I have the penultimate battle - probably - of the VBCW campaignette to CoC rules. We'll see what I can fit in, between baking Christmas goodies. 

Sunday, December 20, 2015

Bolle's Royalist Regiment of Foot


Another weekend, and another regiment added to the ECW collection. This is the Royalist Bolle's Regiment.


I arranged them with the same frontage as my Parliamentary foot, but with fewer numbers to reflect the poor recruiting and equipage of the Royalists in the earlier war. Since I've been painting and basing figures in singles and pairs for some time for the VBCW collection, I'd forgotten what a pain in the fundament basing close-order figures is!

Currently, I have Royalist cavalry on the painting block. A look over the remaining ECW lead pile shows a typical problem with buying multi-figure packs: I don't have enough of some infantry figure poses, and a few too many others. There are enough for another regiment of Royalist foot, but not enough for another Parliamentary regiment. I think I'll need as many packs again to make up a reasonable size force. Ho hum.

Progress with the river sections is slow but steady. I hope to finish them before the month is out. I'm impressed with the Envirotex Lite. It's relatively easy to work with, and the drying time isn't too long. The pack I have is a few years old, and it sat unused in storage in a freezing-cold garage for months, yet it's still perfectly fine. It's a bit expensive, but I think it's worth it.

Friday, December 11, 2015

Edward Montagu's Regiment of Foot


The first of my ECW regiments is now based and finished - Edward Montagu's Regiment of Foot for the Eastern Association Army of Parliament.

Some of my new thistle teasel trees stand in the background.


In spite of my best efforts I've had a spot of trouble with the card bases warping, so I'll revert to using plastic card in future.

The next unit is on the painting block in the shape of the Royalist Bolle's (later Sir George Lisle's) Regiment of Foot. Described as having the blue uniforms typical of the King's Oxford army, it's a moot point as to which shade of blue they wore. Their modern Sealed Knot descendants wear slate-blue, so I'm going with that and slightly lighter blue breeches and montero hats for contrast.

A nice find came my way yesterday at our local Habitat for Humanity store in the shape of three two-inch-thick slabs of pink insulation foam. They cost me a buck, and the money goes to a good cause.


Most if not all of this stuff will go to making rugged upland terrain for my Colonial/VSF gaming. I've got some scraps of wood and bark which will do nicely for rocks and rocky outcrops to break up the regular outline of the slabs. For a look at what a master can do with such items, check out The Mad Guru's Maiwand Day blog.


Saturday, December 5, 2015

River sections - Envirotex Lite


Okay, so... The experiment with Envirotex Lite was a qualified success. It took around four hours to cure in a rather cold man cave, and there were issues with the masking tape used to seal the ends. Even so, the result isn't too bad.


I put a drop each of yellow and blue acrylic ink into the mix whilst stirring. It did look too green at first, but I think it's about the right hue now, especially with the colours of the green or beige cloth underneath. About an hour before it cured altogether I managed to create a few streaks in the varnish to give the impression of flowing water. The darker green patches are where the masking tape acted more like a full-on dam than a restraint. I think using a little less varnish in the next pours should do the trick.

I'm going to experiment with Pledge varnish with green ink next to see if that will give a comparable result. If so, I'll probably go with that method since it'll be easier, cheaper and far less messy.

Friday, December 4, 2015

River sections - work in progress


Yesterday turned into a real cluster-wotsit, with us having to report a raft of nuisance phone calls that have increased in frequency over the past month. All have been from credit and debt-collection agencies seeking the person who had our phone number previous to us. One call late Wednesday night claiming to be from the local police was the last straw. Since the number is one we use for business it'll be too inconvenient to change it. Hopefully the steps we took with various authorities including the FCC will knock those nuisance calls on the head.

It did mean my planned day of work on my next novel went out the window, but instead I managed to do the base-work for Montagu's Regiment of Foot and make a lot of progress with the river sections I've had under way for a couple of months.


I painted the bare wood showing on the inner side of the banks with a mix of brown craft paint and Pledge floor polish. Hopefully this'll seal the banks so the next step, an application of Envirotex Lite epoxy varnish won't leak out. It also gives the effect of shallowing water near the banks. The ends of each section will be sealed with masking tape while I pour the varnish. Check out the videos by maestro Bruce Hirst - they have lots of great tips which are useful for anyone making terrain, including uses for Envirotex Lite.

At the moment I'm thinking of dying the varnish with green acrylic ink and making the layers fairly thin, streaking it with a cocktail stick while it dries so it'll give the impression of flowing water. All being well, I'll finish these over the weekend, then crack on with painting the first Royalist regiment of foot.Watch this space...

Monday, November 30, 2015

Edward Montagu's Regiment of Foote


The first unit to roll off the new painting block is done and ready for the base-work to be applied. Here's Edward Montagu's Regiment of Foot, of the Eastern Association.


These are Pendraken Miniatures 10mm figures. I did think the russet uniforms would make for a boring-looking formation, but on the whole it works en-masse. I did mix musketeers in caps with those in broad-brimmed hats, and painted a few figures with britches of muted blue, black, greys and so on. The armoured pikemen break things up some more. The pikes are mounted on one base for convenience, and have a first and second rank of eight figures. The command is in the rear rank along with two unarmoured pikemen. I stuck with a musketeer to pike ratio of 3:2, which was fairly typical of the early war.

Next up on the painting block is a Royalist regiment of foot. I'm thinking of making it Richard Bolle's (later Sir George Lisle's) Regiment. Their flag was white, but details on their coat colour vary - some sources say red, others blue. As they were part of the King's Oxford Army, I will plump for blue.

The Royalists had a hard time recruiting and equipping their troops. A Royalist foot regiment would typically have a musketeer to pike ratio of 1:1 if they were lucky - some units went into action with clubs and billhooks. I'm going to noodle around with the number of figures and see what looks good. I want to reflect the period, but I don't want to make Royalist regiments too small to take on their Parliamentarian equivalent.


Thursday, November 26, 2015

Happy Thanksgiving!


Turkey Day once more here in the US. We'll be heading over to friends soon for the traditional meal.

Wargaming-wise, I'm making progress with painting the ECW figures. As mentioned before I'm building up the Army of the Eastern Association, and I chose to begin with Edward Montagu's regiment of foot. The musketeers are now finished and in the early basing stage, and the pike and command element are on the painting block and undercoated.


I did put an officer with the musketeers, but decided in the end to keep with just the one command element, which explains the missing man space at the rear of the right-hand base.

Montagu's regiment was issued russet uniforms. Now, I always thought russet had a lot more of a reddish tint than it subsequently proved to have...


Let's face it, it's bloody near khaki, and not the most exciting colour for a uniform. I decided to break things up a little and have some figures wearing muted blues, greens and rusty black here and there, and it seems to have worked.

I did toy with the idea of having the command element as a separate base so they could 'lead units into battle,' but decided for convenience to base them with the pike block. The pike block itself will be a single base and have a frontage of eight figures three ranks deep, with the commander, standard and drummer in the rear rank where they'd naturally be in the course of battle. In the ECW the better armoured troops were placed in the first two ranks and that's what I'll do, with a couple of unarmoured pikemen in the rank with the commander.


Sunday, November 22, 2015

Painting block for 10mm figures


We have a dusting of snow on the ground and the garden is put to bed for the year. Having a bit more spare time now I thought I'd make a painting block suitable for painting 10mm figures, specifically my shiny new ECW collection. The block I already have is best for 15mm-28mm figures, and those poor little 10mm blokes look lost on it.


It's a simple design, based on one a friend of mine uses. Take a block of scrap wood, drill a series of holes in it, fill holes with a number of galvanized nails, and glue the figures to the nail heads using a hot glue gun. The nails make it easy to grip and maneuver the figures to get at all angles with your paintbrush. Bob's your auntie's significant other!

This block will take 45 nails, but I'll typically use fewer than that to allow a bit of handling space. The inaugural batch of figures to grace the block are musketeers for a Parliamentarian regiment of foot. These are Pendraken Miniatures.


I'll paint these up as Edward Montagu's regiment of the Eastern Association, which was raised in Cambridgeshire and issued with russet-red coats. Being early-war Parliamentarian they'd have roughly a 3:2 or 2:1 muskets to pike ratio, which I'm going to represent with 24 musketeer figures to 18 pike, including the command element.

Thursday, November 19, 2015

ECW Shininess


I'm back from a family event in southern Florida, with long road-trips through the south-eastern states there and back. Travel takes its toll and I feel like ten miles of rocky road - but! The mailman delivered my Pendraken ECW order today!

ECW shinies in all their glory.
The figures are clean-cast and have a nice heft to them without feeling or looking clunky. Sometime in the next few days I'll clean off what few pieces of flash there are on the bases, bung 'em in the soapy water to soak, then have at them with the paint. Something to look forward to.

In the meantime, I'm going to press on with a new project - river sections for the tabletop. These are an experiment I'm trying out, using lengths of clear plastic packaging material bound with thin strips of wood as stiffeners. The aim is to make the banks as low profile as possible so they don't stand too proud of the table surface. I'm toying with the idea of sealing off the ends with masking tape and pouring a thin layer of Envirotex Lite epoxy varnish mixed with a little blue acrylic ink onto the plastic. Once the varnish has set the tape is removed. The varnish should stick in place and show the surface beneath (which will be either green or brown anyway - both natural river colours), tinted a watery blue colour by the ink.  


The banks are covered with liquid nails adhesive, the kind you get in those cartridges that fit inside an extruder gun. I press this down (it takes a bit of work to get the stuff to stick to the surface, but perseverance pays), then sprinkle sand on top and press that into the adhesive. In the photo above are (left-right) the basic piece of clear plastic, a piece with the wooden splints glued into place using epoxy adhesive, and a piece with liquid nails smeared on and sanded. I used green sand to show the effect more clearly in the photo, but I'll use plain sand, paint and flock to get the final result.  The section above is a river bend in the making.

I've cut enough sections to stretch over five feet - the width of my gaming board plus a foot or so of bends and so on. The river should work in either N-scale as a river, or in larger scales as a stream. An N-scale bridge and ford will make an appearance somewhere once I've worked out my ideas on how to make the sections.

Saturday, November 14, 2015

Je me souviens Paris


My wife and I were travelling down to Florida for a family event when the dreadful incident occurred, so I was unaware of it until now. The horror which was visited upon a city I know and love has left me shocked and saddened. My sympathies and condolences go to the people of Paris, especially those who lost loved ones. As a tribute to the indomitable spirit of that beautiful city and the citizens of France, here is the singing of La Marseilles from the movie Casablanca.

Friday, November 6, 2015

Thistle do for trees


So, I've finished a batch of one dozen N-scale trees for gaming, with another dozen in the preparation stage. The thistle head method is generally working, although dealing with spiky bits whilst trying to trim the bloody things down to a safe level is a trial. Attaching the flock with spray adhesive is also problematic. It's not as strong a bond as it could be, except when gluing fingers to any loose object in the vicinity; then it works just fine...

Anyway, one vital step is to remove all seeds from the head. This takes some time. The cache shown below is from the next batch of twelve alone.


If this step isn't taken, given the right conditions the seeds will germinate, and you'll have odd tendrils appearing through the foliage! Unless you're gaming some kind of Weird War or Cthulhu scenario, it's probably not something that's desired.

Once the adhesive is dry, I paint the trunks a neutral shade of beige and attach them to circular card bases using hot glue. A spray over with cheap green paint helps stick the flock to the trees, although they still tend to shed if handled roughly. The bases are then painted. I gave mine a simple coat of green craft acrylic with a few brown splotches for soil. I'm not going for great detail here as I find it isn't required - a case of seeing the wood but not the trees once they're deployed on the tabletop. The whole process takes a couple of days for things to dry/set, etc, but the result isn't bad at all.


Those fine chaps at Pendraken Miniatures have emailed to let me know my ECW figures order is on the way. It's a courtesy I appreciate, because it means I can arrange for the order to be safely gathered in ready for me to get my sticky fingers on. I must do something about that bloomin' spray adhesive...

Friday, October 30, 2015

Tree tribulations


Not a lot to report this week, although I have made a few trees from thistle heads to while away the time as I wait for my Pendraken ECW order to arrive. One experiment involved dipping the things in household latex paint, draining off the excess then rolling them in home-made flock created from dried tealeaves. It was not a success. The paint took too long to dry and didn't cover the outer part of the thistle head where I wanted the flock to stick.

The next attempt involved spraying the heads with adhesive and rolling them in dried chamomile tealeaves (there's a theme developing here...) allowing them to dry before giving them a blast with green spray paint. Success! - Except now I've run out of paint and my camera batteries have died, so I can't even take photos of the results...


Thursday, October 22, 2015

ECW project


There seems to be a trend toward gaming the ECW afoot here in the cyberworld of wargaming. Tradgardmaster is dipping his toes in the water, and Jeff at the Saxe-Bearstein blog has an ongoing ECW project. I did game the period in 1/300th scale years ago, but it fell by the wayside. The occasional game at the New Buckenham club kept a small flame of interest flickering. I decided to fan it to life yesterday by ordering some of the excellent Pendraken Miniatures ECW figures, enough to give me three regiments of foot, a regiment of cavalry and a light artillery piece each. I'll add more foot, cavalry and dragoons by and by.

Rules-wise, I intend to use Victory Without Quarter by Clarence Harrison. Jeff kindly brought these to my attention as they have the facility for solo play. I did consider The Perfect Captain's Very Civile Actions: In the end they didn't appeal to me, but their campaign rules, Tinker Fox, look promising.

I'm quite looking forward to getting my new project going!

Monday, October 12, 2015

'The Smoke of Her Burning' & ECW Doodling


My good friend M J Logue's new English Civil War novel The Smoke of Her Burning is released today! She's holding a Facebook party this evening at:- The Review present: The Smoke of Her Burning by MJ Logue

...for those on the social media site; type the above in to take you there. There's fun and prizes, so head on over for a look.
Meanwhile, I'm noodling with various basing and formation options for an ECW army. I'm going to collect forces in 10mm to suit my current terrain, and I'm thinking in terms of early war, which is to say pre-New Model Army. The rules will probably be Victory without Quarter by Clarence Harrison.

With a few one inch square sections of card and a Sharpie pen I made up a profile of two regiments of foote, one Royalist (top) and one Parliamentarian (bottom). 'M' represents musketeers, 'P' pike, 'D' drummer, 'F' flag, 'O' officer. The early war Royalist foote regiments lacked equipment and had a preponderance of pikes to muskets. Parliament didn't have such trouble so typically had a 2:1 musket-pike ratio. I'll probably have a sergeant figure with halberd on two of the musketeer stands. It might work better to have the command figures on a separate base; I'll see.

I'm working to avoid any suggestion of 'sporty little battalions zipping all over the table,' as one rules critic said of a set of Napoleonic rules. The overall length of the regiment is six inches, plenty big enough for a modest sized table. At the moment this gives me an idea of what's possible.

Tuesday, October 6, 2015

ECW, Redux


We're back from a great time at the Archon St. Louis SF/Fantasy convention. As usual I wasn't able to take part in any gaming - I'm on too many panels during the course of the day for that, but all in all a terrific experience, and I'm looking forward to next year.

In the meantime I find my interest in the English Civil War(s) has been rekindled. 
I blame my friend, fellow author M J Logue for this! Reading her excellent Red Horse (An Uncivil War, Book 1) has put me in the mood for researching and collecting in this period again. Check out Red Horse, by the way - it's in paperback and on Kindle - for a great read with plenty of period detail and atmosphere. 
Not Hollie Babbitt, that sweary man - but close!

My original collection was in 6mm. This time around I'll probably get a couple of small armies in 10mm to suit my taste and pocket. Pendraken Miniatures has a nice comprehensive range, as does Old Glory. I'll need to locate some info on uniforms and so on - I sold or gave away most of my reference books when I emigrated - but given the pool of information online these days it shouldn't be too much of a hassle. Rules-wise, I read good things about Very Civile Actions from The Perfect Captain. These are tailored for small forces, and have a campaign system, Tinker Fox, catering for sieges and raids. They're free to download, although the authors do request a contribution to charity by way of thanks. 

The First Muster.  

Tuesday, September 29, 2015

Mortar, Sniper & Boyes


No, they're not a firm of warlike solicitors. These are a quartet of 10mm/N-scale figures made from scratch with Sculpey and a smidge of 'Scribbles' 3D paint.


The figure on the far left is a Pendraken Miniatures SCW standard bearer for comparison. The next two standing figures are crew for the 3" mortar wagon I made previously, and the two prone figures are (top) sniper and (bottom) Boyes AT rifle.

Obviously they don't bear comparison to professionally-sculpted figures, and I take my hat off to those who do this for a living. In spite of some initial concerns whether I'd pull it off I didn't find these that hard to make. A bit of work with the Sculpey, a length of brass rod for the rifle and steel pin for the Boyes, and they're fine for my solo VBCW games.

At the moment they're in the finishing stages of the painting process. A bit of dry-brushing then varnish is all that's left to do. I made the mortar team generic in appearance so they'll fit with any faction. The chap next to the standard bearer is wearing a Havelock cap. In the words of former BBC film critic Barry Norman, "And why not?" The sniper and Boyes fellows are in BUF colours for the next game of my campaign, which will be the Anglican League's pursuit of the BUF as they retreat to Bury St. Edmunds. I'll probably sculpt a few more in the colours of other factions. At the moment we're getting ready for the upcoming Archon weekend in Collinsville, Illinois. More news next week. 
 

Sunday, September 27, 2015

War Wagon


Some time ago I made an N-scale armoured traction engine, similar to those used by the British army in the 2nd Boer War, for my Very British Civil War forces. The intention was (and is) to add wagons of various types for it to pull. So far I had a troop carrier wagon, but I wanted something with a bit of firepower. Hence the construction of a 3" mortar carrier.

"Leviathan" rumbles off, mortar wagon in tow, for a deadly date with the beastly BUF.

The sides of the wagon are made from sections of grooved plastic card. It's meant to represent planking but in this scale it works just fine for extemporised armour formed from lengths of railway track. The wheels are resin castings taken from the Hirst Arts small pipes mold. The 3" mortar itself is a length of plastic-covered wire and plastic card. I'm thinking of scratch-building a couple of crew for the mortar, but we'll see how my eyes hold up!

The traction engine flag can be swapped-out for those of other factions. At the moment it's flying the standard of the Anglican League based in Thetford, home of the famous Burrell traction engine works and source of this vehicle and its conversion.

Hopefully I'll field this little beast and the shiny new wagon in the next game of my VBCW campaign - The Pursuit of the BUF.

Wednesday, September 23, 2015

Hoardings


Back in June 'JP' over at the Herefordshire 1938 blog came up with some excellent rural roadside advertising hoardings. I liked the look of them, so I found some posters of the period online, reduced them in size, printed them off and made a couple of hoardings in N-scale to suit my VBCW collection.


These are made with a couple of mini-dowels for the uprights and matchstick planks for the bracing. The hoarding on the left is promoting the Socialist faction, that on the right (ditto) the BUF. Figures shown are Pendraken Miniatures.

Sunday, September 13, 2015

Attack on Ampton - post-game


So, what happened at Ampton? Before the game the BUF decided (on a die roll) to attempt their defence of the village as far as possible from the barricade across New Road. This was probably not a good idea. Loss of the farm cottages on Smiths Farm Lane led to the loss of the jumping-off point located behind it. Losing a JOP is a serious business in Chain of Command. Add to that the wounding of a junior leader followed by two wounds inflicted on Platoon Leader Huggins and the BUF morale collapsed.

An entrenched defence around the barricade would have forced the Anglican League to either cross open ground or attempt an assault on the fortified farm house at Hall Farm. Given the BUF's previous history of losses, it would've been a smart move to conserve their already shaky morale and possibly winnow down the League's manpower. Still, the die roll commanded, and the events of the game decided otherwise.

The BUF sniper had an excellent post atop the church tower, but he never got into action. Their Molotov cocktail anti-armour weapons could've been nasty, but again the BUF didn't get to use them. On the other side, the Anglican League bought a dynamite team for use against the barricade and a megaphone for abrading BUF morale that Lt. Southgate was dying to try out. Neither got used. Ho hum.
Post-game, the adjustments are as follows:-

Anglican League: Six casualties, 3 will never return, 2 will miss the next encounter and 1 reports for duty right away. The Colonel’s opinion is now at +5 giving the platoon +1 level of support for the next mission. The platoon is pleased with Southgate’s improving battle skills, and their morale now stands at +2. Southgate's outlook is still Affable.

BUF: Twenty casualties, 10 will never return, 5 will miss the next game, 5 will return to duty right away. The Tribune is Displeased with the platoon’s performance and the current rating is -5 = -1 level of Support for the next mission. Platoon morale drops to -3. Platoon Leader Huggins' outlook is still Thoughtful.

The next action will be part of the Pursuit where the Anglican League chases the retreating BUF toward the main objective - the town of Bury St. Edmunds.

Wednesday, September 9, 2015

Attack on Ampton - AVBCW AAR


Once more the sounds of gunfire rattle across the Suffolk countryside as the men of the Anglican League and the BUF slug it out.

Previously, the BUF withdrew to a defensive line along the axis West Stow-Culford-Ingham-Ampton, with an outpost on the east side of the Livermere. The Anglican League High Command (ALCH) determined to attack the small village of Ampton, thought to be the weakest point in the line. Intelligence reports (the Rev. Shotley's wife's sister Doris) revealed Ampton is garrisoned by the battered remnants of III Platoon St. Edmundsbury Legion, AKA The Men Who Lost the Crown Jewels.

New Road passes through the village parallel to the A134 a mile away to the west across a stretch of high ground. A mile south of Ampton the New Road turns west at the hamlet of Timworth to join the highway. ALCH aims to pierce the enemy lines at Ampton then swing west to cut the BUF line of communication. Lt. Southgate's platoon has been selected to do the honours, and the Colonel is pleased to provide extra support for the operation.
* * * *
The BUF platoon will attempt defense in depth, their main brief being to prevent any passage by hostile forces down New Road. A barricade has been erected across New Road where the walls of Ampton Hall and Hall Farm face across the road. A section occupies the row of cottages on the lane to Smith’s Farm. The six regulars lost through rout in the airfield skirmish have now returned to the colours. The platoon has been brought up to strength and are equipped with Molotov cocktails which will be used on any vehicle attempting to cross the barricade.

A lookout-cum-sniper is stationed in the church of Ss. Peter and Paul tower. He is equipped with a whistle and football rattle to raise the alarm when enemy forces are spotted - hopefully without making his own position obvious.
* * * *

The game was fought to Chain of Command rules. Initial Force Morale was 8 for the League, 7 for the BUF. After scouting, both sides selected their support. For this scenario there is a cap of 10 on 2d6, with half going to the defending BUF. Due to the results of previous games the League gain one level of support, the BUF loses one. The dice roll came up 6, so that made 7 support for the AL, 2 for the BUF. The choices were:  

Anglican League: Austin AC, Dynamite team, megaphone
BUF: Molotov cocktails, sniper

The BUF were entitled to entrenchments but I counted the heavy barricade and cottages as these.
* * * *

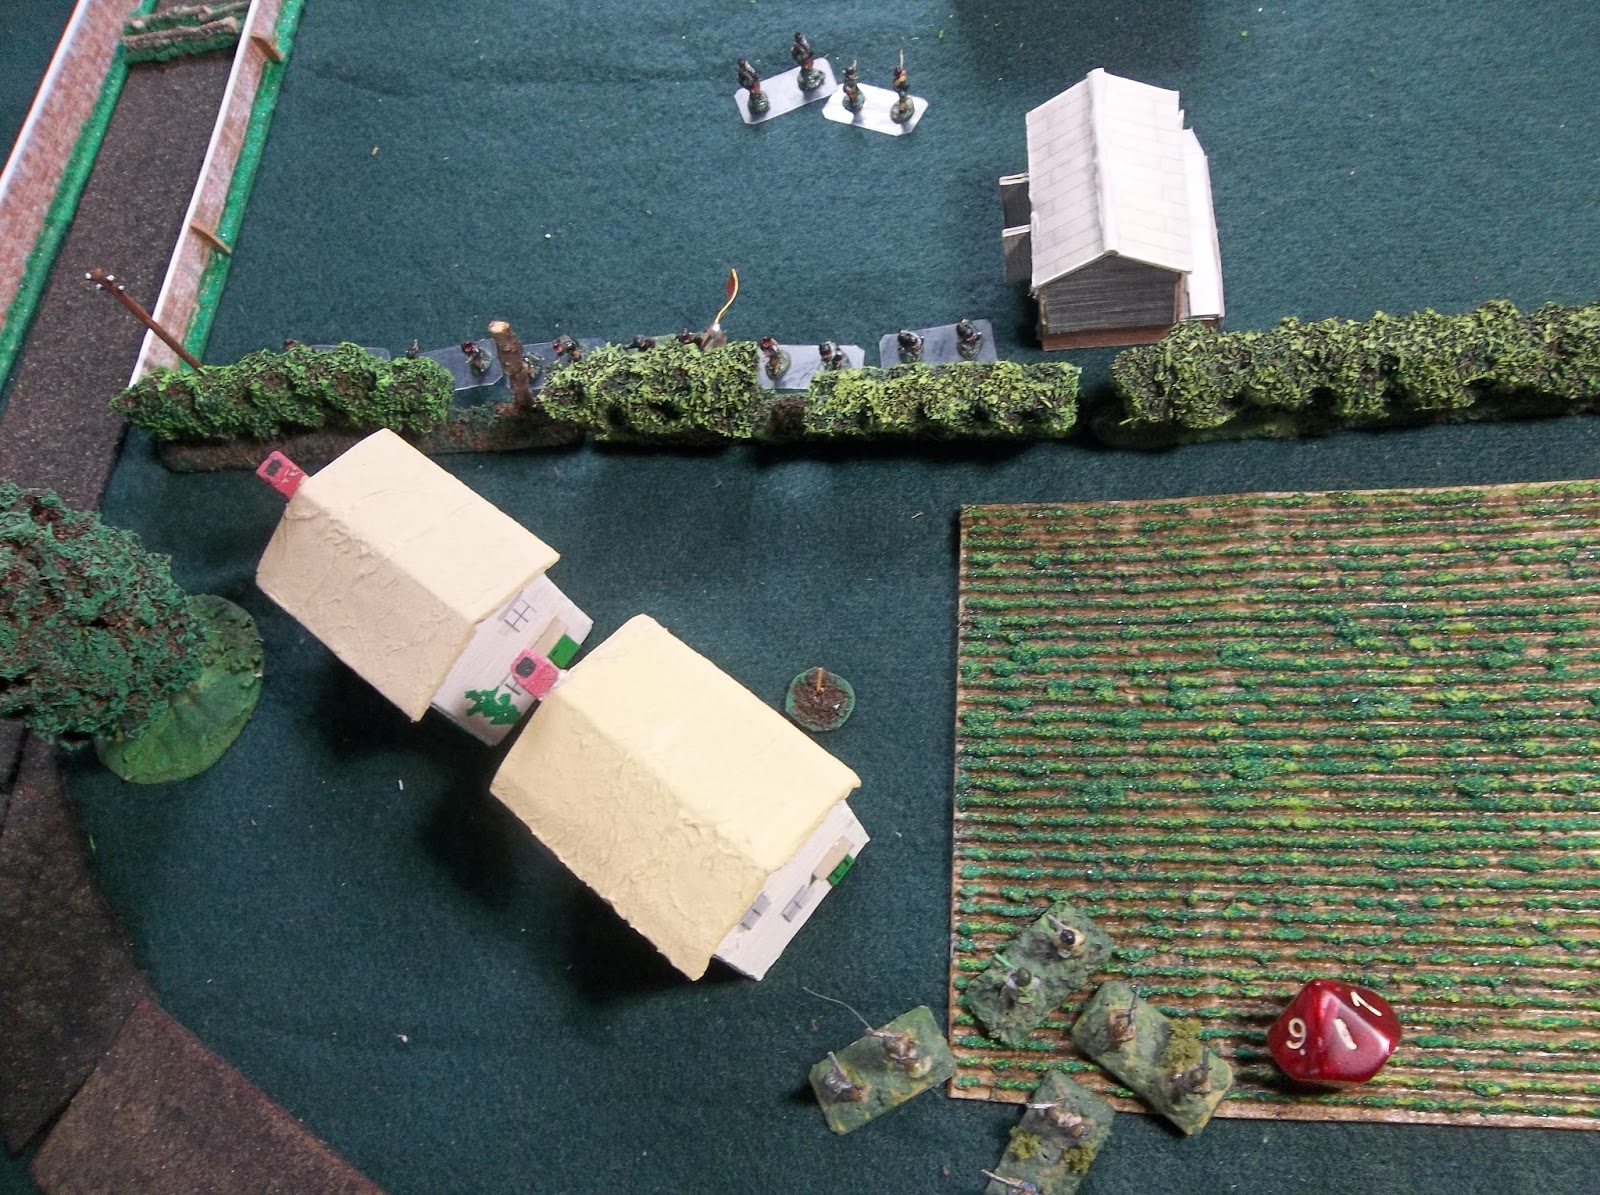
The scene of action, looking south along New Road. Bramble Cottage stands to the bottom left of the image, Hall Farm is top-right, with the Alms Houses and Ss. Peter & Paul Church just visible at the top. The Anglican League enters from the north.
The League took up positions from their jump-off points. Lt. Southgate occupies Bramble Cottage, supported by the Austin AC. The BUF posted a section in the two farm cottages across the lane to Smiths Farm, and a brisk exchange of fire broke out between them and the left-hand AL section. In the center of the AL position lurks the dynamite team in their natty red caps, ready to go into action against the barricade once the way is clear.
The fighting escalates as the Austin moves up to pour twin Vickers MG fire into the cottages. With shock increasing on the BUF within, the rightmost AL section scramble over the wall and make for the trees.
The pressure becomes too much for the BUF. They bolt out the back of the cottages and run for safety across the Hall Farm yard.
Third Section AL moves toward the cottage only to be surprised and shot-up by another BUF section led by the Senior Leader Huggins deploying behind the hedge. (This was about the only real success the BUF scored in this game of poor die rolls. Even this came to an end with the use of a CoC die to interrupt the BUF move and get the League men into cover.)

Matters escalate over in the woods, where Lt. Southgate deploys a section to outflank the barricade. It runs into a BUF section trying to outflank the AL position. After an initial blast of fire rattles their nerves, the men of the AL return the compliment. (Although both sides had about equal cover, again the BUF's abysmal dice rolls hindered them and the section soon broke.)

Back at the cottages a desperate firefight ensues between Platoon Leader Huggins' section and the AL occupants of the cottages. Winnowing Lewis gun fire strike the BUF hard. In a desperate attempt to hold the line against the League, Huggins tries to withdraw his men to the farmhouse so they can make a better stand, but as they cross the farmyard they are shot down almost to a man. Huggins and the section leader are both wounded but escape. All effective opposition ceases, and the Anglican League takes Ampton.

The End
* * * *
My leg is giving me jip this afternoon, so I'll post the after-game report later.


Sunday, September 6, 2015

Going Green


My leg is a lot better. An Aspirin a day and resting the old limb has done wonders. Although it's still a bit of a strain to stand around a wargame table for any length of time I have at least returned to model making. One long-term project has just come to fruition - the growing of thistle plants to make N-scale trees.

I sowed the seeds back in summer 2013. The plants grew quickly but didn't develop the characteristic stalks until this year. This summer they yielded around sixty heads and the flower clusters attracted a lot of pollinating insects - vital for any garden.

Once the flowers had died back I harvested the heads...


These are drying out, and once they are dry, will be turned into something like this...


The stalks can also be put to good use as a component of 'bug hotels.' Gardeners know good insects are vital for any garden to flourish. Giving the little chaps somewhere to hibernate over the winter months helps them and the gardener get a head start the following year. 

Take the stalks and allow them to dry out thoroughly. Find a few cans - frozen fruit juice and coffee tubs do nicely - and keep them ready.

Cut the dried stalks into lengths roughly equal to the length of the cans. It doesn't matter if they're shorter or longer. Ensure the stalks are hollow by using a rod to push out the fibrous interior. Fill the cans with the lengths of stalk. Once these are packed tight, locate the bug hotel in a place out of the weather such as under the eaves of a shed or other outbuilding, and fix it into place. Over time insects will crawl into the stalks and hibernate happily during the winter, ready to get to work next year.  


Thursday, August 27, 2015

Getting back into the swing of things


Thanks to all who gave their best wishes. My leg is getting better. The doctor confirmed a diagnosis of 'superficial phlebitis,' a condition where a small blood clot forms in a surface vein. Thankfully it's treatable by resting said limb and applying a heat pad at intervals, although there's nothing 'superficial' about the pain when the little bugger first strikes. I should be fine in a month, tops.

In the meantime I've finished the Alms House for the next VBCW game, and made a start on a pond for my terrain collection. I would post a photo or two of the process but my camera has chosen to devour another set of batteries. First world problems...

Saturday, August 22, 2015

Ouch...


Not much happening gaming or modelling wise this week. An excruciating pain in my left leg meant a trip to hospital and orders to rest up for a few days. There were no blood clots moving around and doing bad things, thank goodness, and the leg is feeling better every day. I have a follow-up check with my GP on Monday. Hopefully she'll give me the all-clear.

In the meantime, I did manage to make a start on an N scale model alms house for my VBCW gaming. It'll feature in an up-coming game as part of the campaign between the Thetford Anglican League and the BUF of Bury St. Edmunds.

Sunday, August 9, 2015

Volcanic crater - tutorial


Thanks for all the kind comments on the making of my shell craters. I've now adapted the design to produce two volcanic caldera suitable for Pulp/SF/VSF gaming.

Follow the first steps given in the previous post to produce the basic crater. This time place the craters on a level surface, mix a small batch of watery plaster and pour it into the depression. It should form a smooth surface as shown below.

Next, add blobs of hot glue to the surface, giving the glue-gun trigger a half-pull to get smaller droplets. You'll find the glue doesn't stick to the plaster and comes away. This is perfectly fine. Remove any strands of glue from the droplets and replace them on the surface in a random pattern.


Next, mix yellow acrylic ink and watered-down PVA adhesive and pour slowly and carefully into the crater. The pour shouldn't disturb the glue blobs if you're careful. Don't worry if the ink mix runs over the side. Any spills will be covered later. You'll need to repeat this step once.

Glue discs of card to the bottom of the caldera, leaving a rim of about a quarter-inch wide. Wait until the glue has dried then mix yellow and red ink with Pledge floor polish to make a suitably fiery orange shade and pour onto the yellow glue surface. Add a few drops of water and work it around with a brush to get an even spread. You'll find the polish and water will dry to leave a crackle effect, revealing more of the yellow beneath the orange and the glue blob "bubbles" giving the effect of hotter lava welling up from below the cooling orange crust.


Once this is dry, add ground effect around the caldera by smearing 'Liquid Nails' construction adhesive onto the card surface and pressing dry coffee grounds into it. This'll create rough terrain that looks like it's cinder-covered. At this stage I also made the sides of the crater more uneven by applying smears of spackle.


Two intrepid explorers get uncomfortably close to the lava wells.
Once all that is dry, paint using ordinary craft paints to get the desired color scheme. I chose a dark gray, and added streaks of dull yellow and brown to represent sulfur out-gassing.


home page uniques