The lighting wasn't quite right when I took the photo. It looks a great deal more orange than it does in real life. I'll build another one of these days to use as a master- model and cast a few in resin. A few more houses and cottages, a pub and a church to go...
Wednesday, September 5, 2012
Some AVBCW buildings
Here are a couple of buildings I made for the VBCW in 10mm. First up is a blockhouse, built of corrugated iron and field stone, with a plank and turf roof. It can house up to eight fighters, and a machine gun could set up shop on the roof quite comfortably with a few sandbags for protection.
Next is a typical British semi-detached council house, of the type built in the hundreds of thousands all over the UK from 1920 onwards as part of the "Homes for Heroes" campaign. The program gave employment to troops returning from WW1, boosted the post-war economy and, indeed, provided inexpensive housing for millions.
The lighting wasn't quite right when I took the photo. It looks a great deal more orange than it does in real life. I'll build another one of these days to use as a master- model and cast a few in resin. A few more houses and cottages, a pub and a church to go...
Tuesday, September 4, 2012
Can you tell what it is yet?
A small GASLIGHT project I've had on the slipway for quite a few months has finally begun to take proper shape. In the immortal words of Rolf Harris, "Can you tell what it is yet?"
Thursday, August 30, 2012
AVBCW - The assembled forces
Here are a couple of photos of the combined LDV and Socialist Militia companies. Both units have integral armor and artillery, along with support weapons in the shape of the sturdy Vickers MG.
The LDV favor ten-man sections including a Lewis LMG and second. Mostly composed of rural laborers, they have a leavening of "old sweats" from the Great War and some TA members who decided the keep their military skills at home.
The Socialists favor twelve comrade sections, with the exception of the Socialist Women's Alliance section (nearest camera) which has fourteen. All sections include a Lewis gun team. The Company HQ numbers ten, including the CO and Lewis, which acts as a reserve force immediately to hand.
Mostly composed of workers and unemployed folk from the towns and cities, like their rivals in the LDV they also have a number of former soldiers and TA in their ranks.
Both sides have acquired their heavier weapons from a number of sources - ex-military stock and materiel donated by various supporters.
I have a copy of Went the Day Well rules, which I'll adapt to this scale and see how they play. I intend to build roughly comparable forces for the BUF and Anglican League sometime in the future.
On the Colonial front, I upgraded the chance cards used in Sharp Practice, printing them out in color and sticking them to old playing cards for greater durability and ease of use. As mentioned before I hope to get the heliograph section from Black Tree Designs sometime soon. Watch this space.
The LDV favor ten-man sections including a Lewis LMG and second. Mostly composed of rural laborers, they have a leavening of "old sweats" from the Great War and some TA members who decided the keep their military skills at home.
The Socialists favor twelve comrade sections, with the exception of the Socialist Women's Alliance section (nearest camera) which has fourteen. All sections include a Lewis gun team. The Company HQ numbers ten, including the CO and Lewis, which acts as a reserve force immediately to hand.
Mostly composed of workers and unemployed folk from the towns and cities, like their rivals in the LDV they also have a number of former soldiers and TA in their ranks.
Both sides have acquired their heavier weapons from a number of sources - ex-military stock and materiel donated by various supporters.
* * *
All figures and models are mounted on plasticard. Infantry bases are 1" front by 1/2" deep. Artillery and cavalry are 1" square. The Vickers guns are 1" by 3/4" deep. All vehicles have 3/4" width and are 1/4" longer than the model. Two vehicles can pass each other on the roads I use. I have a copy of Went the Day Well rules, which I'll adapt to this scale and see how they play. I intend to build roughly comparable forces for the BUF and Anglican League sometime in the future.
On the Colonial front, I upgraded the chance cards used in Sharp Practice, printing them out in color and sticking them to old playing cards for greater durability and ease of use. As mentioned before I hope to get the heliograph section from Black Tree Designs sometime soon. Watch this space.
Tuesday, August 28, 2012
A spot of attribution
Some visitors to this blog inquired about the origins of the medical and cookhouse figures shown in the masthead photo. I bought them from eBay and the seller didn't know, but I've since found they come from Black Tree Designs (US).
The medical team are the appropriately titled "Kill or Cure" vignette, and the Cookhouse team may be found here.
I have had good results from Black Tree, with their reasonable prices and quick dispatch of orders. Some time in the future I hope to buy their heliograph team, which would make a splendid addition to the garrison and field force of British Ukraziland.
I'm a bit busy making commissions and getting ready for the upcoming Archon convention in Fall, but I should get a wargame or two in soon. The next scenario for Ukraziland is stirring in my mind. I need to work out a few details, but it should be a challenge for the garrison.
The above shows the LDV cavalry, with the armored lorry Black Shuck on the road, supported by the new Vickers team. The road itself is cut from a tar shingle, and the photo shows how flexible it is where it follows the contours of the cloth. Time permitting I'll take a couple of photos of the entire force of LDV and militia soon.
The medical team are the appropriately titled "Kill or Cure" vignette, and the Cookhouse team may be found here.
I have had good results from Black Tree, with their reasonable prices and quick dispatch of orders. Some time in the future I hope to buy their heliograph team, which would make a splendid addition to the garrison and field force of British Ukraziland.
I'm a bit busy making commissions and getting ready for the upcoming Archon convention in Fall, but I should get a wargame or two in soon. The next scenario for Ukraziland is stirring in my mind. I need to work out a few details, but it should be a challenge for the garrison.
* * *
I did manage to finish the Pendraken AVBCW figures bought recently. Here are the Vickers MG teams (one each for the LDV, Socialist Militia and BUF), and two period lorries.The above shows the LDV cavalry, with the armored lorry Black Shuck on the road, supported by the new Vickers team. The road itself is cut from a tar shingle, and the photo shows how flexible it is where it follows the contours of the cloth. Time permitting I'll take a couple of photos of the entire force of LDV and militia soon.
Tuesday, August 21, 2012
AVBCW Mobile Forces
My current batch of VBCW figures from Pendraken Miniatures is almost done. Here are a few photos of the mobile forces for the Flegg Fencibles LDV and the Socialist Militia.
These are the mounted contingent of the LDV - the Rollesby Roughriders. Based in stables close by the village of Rollesby on the main road between Great Yarmouth and Norwich, these fellows act as the Fencibles' quick-response unit.
The Socialists have fixed their calloused working-class hands on a WW1 vintage Austin armored car. It has been given the name "Strike," to reflect the right of the worker to withhold labor and the hard-hitting punch of twin Vickers MGs.
I found vehicles and cavalry easy to paint, and that's coming from someone who normally finds painting cavalry a chore, no matter which scale. The mounted troops are on bases with rough grassland effect, but the vehicle bases are modeled to resemble road surfaces, since they'll spend more time than not on roads.
I have two more lorries to paint, and three Vickers teams, one each for LDV, Militia and BUF. Photos to come, time and other commitments permitting.
These are the mounted contingent of the LDV - the Rollesby Roughriders. Based in stables close by the village of Rollesby on the main road between Great Yarmouth and Norwich, these fellows act as the Fencibles' quick-response unit.
Armoured might - On the left "Black Shuck." On the right "Strike."
The armored component of the two forces consists of a lorry with improvised armor in SCW fashion. It's been given the name "Black Shuck" after the legendary Devil's dog which is supposed to haunt parts of Norfolk during the hours of darkness. Supposedly any who see the dog will die a horrible death. In actual fact, the legend came out of the smuggling industry along the coast. The "Gentlemen" spread the tale around to keep folks at home at night so they could work unobserved. Still, the LDV think the name seems appropriate - all who see the vehicle will die a horrible death!
I found vehicles and cavalry easy to paint, and that's coming from someone who normally finds painting cavalry a chore, no matter which scale. The mounted troops are on bases with rough grassland effect, but the vehicle bases are modeled to resemble road surfaces, since they'll spend more time than not on roads.
I have two more lorries to paint, and three Vickers teams, one each for LDV, Militia and BUF. Photos to come, time and other commitments permitting.
Labels:
10mm figures,
AVBCW,
Pendraken Miniatures,
scale model,
wargaming
Wednesday, August 15, 2012
AVBCW Artillery
A sad and hectic few days have ended with my wife and I finding calmer times in which to return to an even keel. Getting back to the hobby is quite a relief. I took some photos of the recently-completed artillery component of my 10mm AVBCW collection last week, and have posted them below.
These are British 18-pounder guns from Pendraken Miniatures' WW1 range. One of my favorite artillery pieces, I believe it was the gun-type used by my great uncle's battery of the Royal Field Artillery during the Great War.
The center and right pieces will fight alongside the LDV and Socialist factions. The piece on the left I painted in a Black & Tan fashion to serve the BUF faction, when I get around to building it. The solitary figure to the far right is an as yet unnamed command figure for the Socialists.
I have more figures in the shape of cavalry and infantry in the works. More photos to come once they're painted and based.
These are British 18-pounder guns from Pendraken Miniatures' WW1 range. One of my favorite artillery pieces, I believe it was the gun-type used by my great uncle's battery of the Royal Field Artillery during the Great War.
The center and right pieces will fight alongside the LDV and Socialist factions. The piece on the left I painted in a Black & Tan fashion to serve the BUF faction, when I get around to building it. The solitary figure to the far right is an as yet unnamed command figure for the Socialists.
I have more figures in the shape of cavalry and infantry in the works. More photos to come once they're painted and based.
Friday, July 27, 2012
Gamer, interrupted
My wife and I have both been busy these last few days, as a number of things happened unexpectedly which require sorting out. I've mentioned before a house move might be on the cards. This is now a probability rather than a possibility. The when and where remain to be decided.
In the meantime, gaming will continue as-and-when. The poll result and comments have come out firmly in favor of retaining the tembe, and that's the decision I'll go with. More to follow on that.
The good chaps at Pendraken have notified me the latest AVBCW figures are on their way. With the good graces of the two post offices and a following wind, I should have the new shinies in my hands by the end of next week. Photos to come.
In the meantime, gaming will continue as-and-when. The poll result and comments have come out firmly in favor of retaining the tembe, and that's the decision I'll go with. More to follow on that.
The good chaps at Pendraken have notified me the latest AVBCW figures are on their way. With the good graces of the two post offices and a following wind, I should have the new shinies in my hands by the end of next week. Photos to come.
Friday, July 20, 2012
Hedgerows
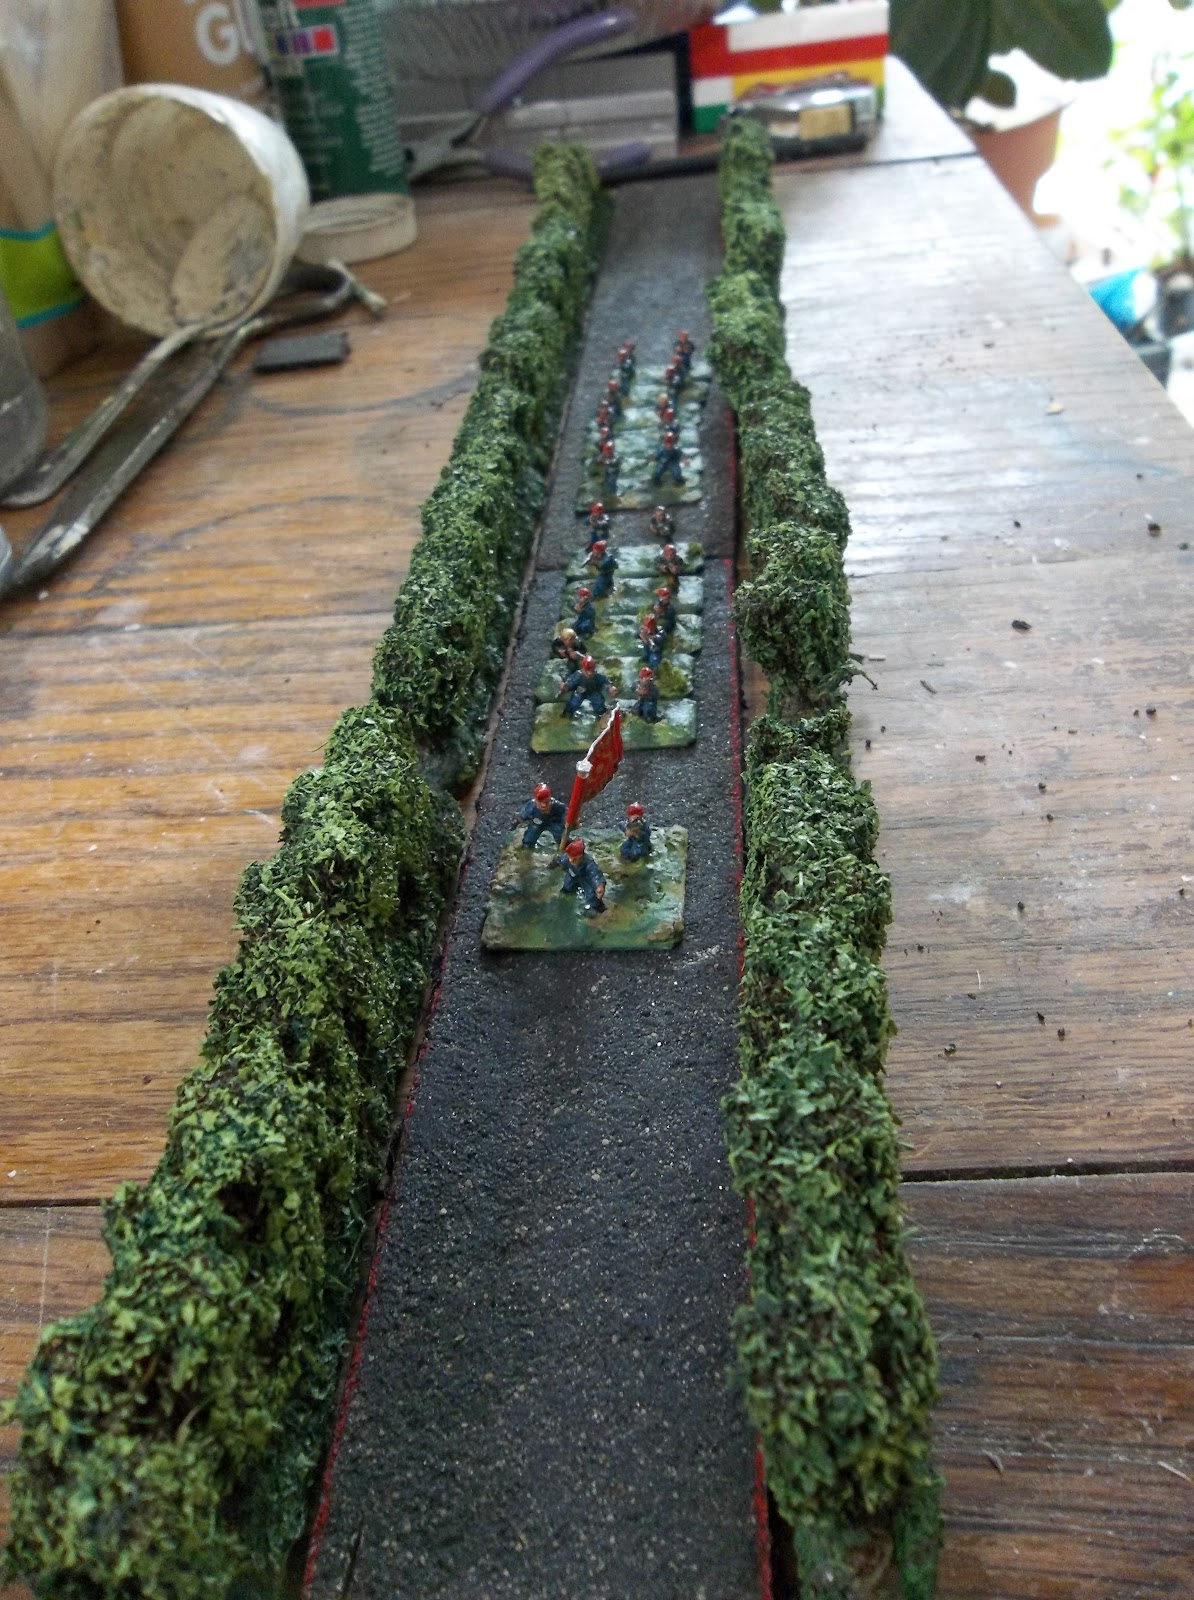
I think more often than not, after buying figures and models in a new scale, we gamers only realize we need matching scenery too. Since starting A Very British Civil War in 10mm, I've turned my hand to making some typical British hedgerows for the period.
I've put a batch up for sale on eBay, to help fund my addiction hobby. Click here for details.
A platoon from the Norwich Socialist Militia on the march to spread
Socialism throughout East Anglia. SCW figures by Pendraken Miniatures.
The tarmac road surface is cut from old roofing shingles. They're easy to cut, durable, and flexible enough to follow the contours of the table where needed. Of course, in the 1930's many roads throughout the UK lacked metaled surfaces, so I might paint some to represent the ordinary dirt farm-track style with the central strip of grass. I plan on making enough for three or four roads, which should be sufficient for my gaming table.
One of the beauties of this scale is, a lot can be fitted into a relatively small area. As an example of what can be done, check out the wonderful dioramas by Portuguese modelers Carlos Briz and Mário Laranja.
Wednesday, July 18, 2012
Mini-Campaign aftermath
And so the Raid on the Tembe campaign comes to a close. The last vestige of Sheik Yabhouti's hold on the region has been erased, leaving the British in control - after a fashion.
It proved a hard little expedition in many ways, especially the actions following the relief of Willoughby Pond's trading post. The Barsetshires lost five men dead, and others badly wounded. 2nd Section received the worst of it, and will need to be reconstituted and retrained.
Private Hare did not do anything to exonerate his previous blemished record; indeed he retired in the face of the enemy with the rest of the section to which he was attached. As a result he has been packed off on the troopship home. Once he reaches the depot in Barchester, he'll be formally Discharged from Service.
As for the Ukraziland Rifles, their heavy losses have caused something of a crisis. Recruitment has dropped off, due to the natives' belief the British are merely using them as cannon-fodder, and it's unlikely they will field a full platoon in the near future. This leaves something of a shortage of manpower, with commensurate difficulties in holding the newly-acquired territory.
And what of the tembe itself, that took so many lives, and much time and treasure to seize? As a fortified structure, it can't be left to whoever can claim it. Two solutions offer themselves. The British could destroy it and withdraw. A garrison could be left to hold it as an outpost, but this will draw on very limited manpower. If it is held, perhaps it could be used as the nucleus of a settlement inhabited by friendly natives. Equally, it could prove a magnet for all the hostile forces in the region. Decisions, decisions...
And so I place the decision in the hands of the readers of this blog. I've set up a new poll, with three questions. What shall be done with the tembe? Destroy it, Garrison it, or Other. If you vote Other, please leave a comment stating what other option you'd favor.
It proved a hard little expedition in many ways, especially the actions following the relief of Willoughby Pond's trading post. The Barsetshires lost five men dead, and others badly wounded. 2nd Section received the worst of it, and will need to be reconstituted and retrained.
Private Hare did not do anything to exonerate his previous blemished record; indeed he retired in the face of the enemy with the rest of the section to which he was attached. As a result he has been packed off on the troopship home. Once he reaches the depot in Barchester, he'll be formally Discharged from Service.
As for the Ukraziland Rifles, their heavy losses have caused something of a crisis. Recruitment has dropped off, due to the natives' belief the British are merely using them as cannon-fodder, and it's unlikely they will field a full platoon in the near future. This leaves something of a shortage of manpower, with commensurate difficulties in holding the newly-acquired territory.
And what of the tembe itself, that took so many lives, and much time and treasure to seize? As a fortified structure, it can't be left to whoever can claim it. Two solutions offer themselves. The British could destroy it and withdraw. A garrison could be left to hold it as an outpost, but this will draw on very limited manpower. If it is held, perhaps it could be used as the nucleus of a settlement inhabited by friendly natives. Equally, it could prove a magnet for all the hostile forces in the region. Decisions, decisions...
And so I place the decision in the hands of the readers of this blog. I've set up a new poll, with three questions. What shall be done with the tembe? Destroy it, Garrison it, or Other. If you vote Other, please leave a comment stating what other option you'd favor.
* * *
Now for a word about the rules. Once again Sharp Practice proves itself a versatile set of rules for solo Colonial play, with a few adaptations. My only problems really stem from my limited playing area. Like most (all?) gamers I'd really like a larger, permanent table that can be set up and left, allowing room for maneuver and time to game. One of these days...Saturday, July 14, 2012
Attack on the Tembe
Before the game I had to decide on the politics of the situation. The Ukrazi tribe could offer help to the Yabhouti Arab slavers currently occupying the tembe. Previous heavy defeats at the hand of the British and a long-standing dislike of the Arabs made this chance remote. I decided there was only a 20% chance the tribe would fight, and rolled 23% on decimal dice - close, but no cigar. The Yabhoutians were on their own.
And so to the game. Captain Pike had taken direct control of 1st Section of the Barsetshire platoon, CSM Harrington control of the battered 2nd Section, now down to seven effectives, including the recalled Pvt. Hare. Cpl. Powell's 3rd Section were brought ashore to provide the vital manpower needed for the final assault.
The terrain in the area is tangled, with stands of scrub, trees, long grass and other obstacles to confuse any white man passing through. I decided to roll 1d6 to see which section of the table the British would enter by from the East. A score of 1 placed them closest to the tembe, 2-3 in the central section, and 4-6 the area nearest the river - which Capt. Pike would prefer.
Needless to say, he didn't get his way. The die decided the British entry point would be close to the tembe. Cpl. Powell led the way through the trees and scrub to within sight of the tembe, standing on its low hill.
Captain Pike with 1st Section followed close on his heels. As ordered, Powell approached the tembe and promptly received fire from its walls. A great wail of fear told the British soldiers slaves were present.
Powell followed pre-encounter orders and withdrew to the scrub line to conduct a heavy rifle fire upon the embrasures in the tembe walls.
Pike had two options for breaking into the tembe. One was a bombardment from the Indian Army mountain gun, crewed by Bombardier Lal Singh, but Singh appeared to have been delayed in the brush. The second was a petard placed against the tembe gate. Appraised by Cpl. Powell that slaves were present, Pike decided on the petard. Even though placing it posed more risk for his troops, it would be safer for the unfortunates within than a full-on bombardment.
Girding their loins, Pike and his men rushed toward the gate, as CSM Harrington came up on their left.
Pike noticed that fire from the tembe had already slackened considerably as Powell's musketry came into play. It helped his aim considerably. He and his men reached the log gate, and set to work with practiced hands to set the charge.
Meanwhile, CSM Harrington ran into an ambush. On approaching a belt of scrub he and his men were totally surprised by a blast of musketry. As powder smoke filled the air, Harrington could see the dark shapes of tribal musket men dodging and ducking amidst the scrub. He directed his men to return fire, but so rattled were they, their efforts proved negligible.
Pike's men set the charge and Pike himself lit the fuse. Retiring immediately, they were still almost caught by the explosion. As his head reeled and ears rang, Pike made a mental note to brush up on his field demolition techniques.
Not far away, Harrington and 2nd Section were in trouble. Pvt. Alder fell dead, shot through the head, and the shock began to pile up. The section's return fire was still ineffective, and the men began to waver.
As smoke from the petard cleared, Cpl. Powell seized his chance. Standing up, he shouted "Come on, lads!" and with a rush and a cheer they stormed across the open ground and up to the walls. Pike directed fire from his own section upon the embrasures nearest the gate, and was joined by Lal Singh with the mountain gun.
Powell and his men thrust the rifle muzzles in through the embrasures and fired unaimed. Return fire from the tembe all but vanished, as Pike led his men with a cheer to the gaping hole where the gate had been. Behind him, 2nd Section had retired from contact. Harrington began berating them, ordering them to stand fast. Reluctantly, 2nd Section slowly pulled itself together, but the fight appeared to be all but over.
Even though the Yabhoutians were protected by the stout walls of the tembe they'd suffered from Powell's well-directed fire. Only the leader, Wazir Amini Tago and one of his men survived out of the dozen or so original garrison. Even so, he met Pike at the gate in hand-to-hand combat.
The fight surged back and forth, with shrewd blows taken and given. Eventually, bloody and rather annoyed, Pike beat his man down and placed the point of his sword at the Wazir's throat. "You will yield, sir!" he snapped.
The Wazir complied. The slaves were liberated, the tembe fell, and with it the last bastion of Sheik Yabhouti's influence in the Ukraziland region.
And so ends the Raid on the Tembe mini-campaign. A follow-up with thoughts on the game will appear soon.
And so to the game. Captain Pike had taken direct control of 1st Section of the Barsetshire platoon, CSM Harrington control of the battered 2nd Section, now down to seven effectives, including the recalled Pvt. Hare. Cpl. Powell's 3rd Section were brought ashore to provide the vital manpower needed for the final assault.
The terrain in the area is tangled, with stands of scrub, trees, long grass and other obstacles to confuse any white man passing through. I decided to roll 1d6 to see which section of the table the British would enter by from the East. A score of 1 placed them closest to the tembe, 2-3 in the central section, and 4-6 the area nearest the river - which Capt. Pike would prefer.
Needless to say, he didn't get his way. The die decided the British entry point would be close to the tembe. Cpl. Powell led the way through the trees and scrub to within sight of the tembe, standing on its low hill.
Captain Pike with 1st Section followed close on his heels. As ordered, Powell approached the tembe and promptly received fire from its walls. A great wail of fear told the British soldiers slaves were present.
Powell followed pre-encounter orders and withdrew to the scrub line to conduct a heavy rifle fire upon the embrasures in the tembe walls.
Pike had two options for breaking into the tembe. One was a bombardment from the Indian Army mountain gun, crewed by Bombardier Lal Singh, but Singh appeared to have been delayed in the brush. The second was a petard placed against the tembe gate. Appraised by Cpl. Powell that slaves were present, Pike decided on the petard. Even though placing it posed more risk for his troops, it would be safer for the unfortunates within than a full-on bombardment.
Girding their loins, Pike and his men rushed toward the gate, as CSM Harrington came up on their left.
Pike noticed that fire from the tembe had already slackened considerably as Powell's musketry came into play. It helped his aim considerably. He and his men reached the log gate, and set to work with practiced hands to set the charge.
Meanwhile, CSM Harrington ran into an ambush. On approaching a belt of scrub he and his men were totally surprised by a blast of musketry. As powder smoke filled the air, Harrington could see the dark shapes of tribal musket men dodging and ducking amidst the scrub. He directed his men to return fire, but so rattled were they, their efforts proved negligible.
Pike's men set the charge and Pike himself lit the fuse. Retiring immediately, they were still almost caught by the explosion. As his head reeled and ears rang, Pike made a mental note to brush up on his field demolition techniques.
Not far away, Harrington and 2nd Section were in trouble. Pvt. Alder fell dead, shot through the head, and the shock began to pile up. The section's return fire was still ineffective, and the men began to waver.
As smoke from the petard cleared, Cpl. Powell seized his chance. Standing up, he shouted "Come on, lads!" and with a rush and a cheer they stormed across the open ground and up to the walls. Pike directed fire from his own section upon the embrasures nearest the gate, and was joined by Lal Singh with the mountain gun.
Powell and his men thrust the rifle muzzles in through the embrasures and fired unaimed. Return fire from the tembe all but vanished, as Pike led his men with a cheer to the gaping hole where the gate had been. Behind him, 2nd Section had retired from contact. Harrington began berating them, ordering them to stand fast. Reluctantly, 2nd Section slowly pulled itself together, but the fight appeared to be all but over.
Even though the Yabhoutians were protected by the stout walls of the tembe they'd suffered from Powell's well-directed fire. Only the leader, Wazir Amini Tago and one of his men survived out of the dozen or so original garrison. Even so, he met Pike at the gate in hand-to-hand combat.
The fight surged back and forth, with shrewd blows taken and given. Eventually, bloody and rather annoyed, Pike beat his man down and placed the point of his sword at the Wazir's throat. "You will yield, sir!" he snapped.
The Wazir complied. The slaves were liberated, the tembe fell, and with it the last bastion of Sheik Yabhouti's influence in the Ukraziland region.
And so ends the Raid on the Tembe mini-campaign. A follow-up with thoughts on the game will appear soon.
Subscribe to:
Posts (Atom)