Showing posts with label 15mm models. Show all posts

Wednesday, January 24, 2024

Painting Peasantry - 2

Some progress on the peasantry. The first batch of twelve is done and ready for the base work. 

I gave these a double dip in the gunk to get the proper hard working, hard used grungy peasant look. For some reason, perhaps the pervading damp weather, the matte varnish turned out a bit shiny. I might give them another go over when the weather's warmer.

The next batch are on the painting block, ready for undercoating. 

Lying face-down to the right is the 'War Doctor,' a present for my Whovian wife.

Saturday, April 2, 2022

To the Manor ~ Done!

'tis finished at last. I'm going to call this done. 

Camelot! Camelot! Camelot! (It's only a model...) Shush!

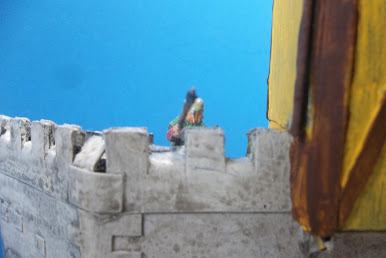
The roof is a print from a paper craft HO scale railway model, reduced slightly in scale and varnished. The design began as an American wooden shingle type roof, but looks sufficiently like a medieval stone tile pattern it'll do fine. The windows I left blank, painting them in with a dark brown shade to look more like a natural shadowy interior. The whole was given a coat of Future/Clear/Pledge/Whatever polish with some very diluted sepia and black ink to give it a weathered 'recent rainfall' look.

Now go away, or I shall taunt you a second time!

In the Lion Rampant rules this manor would count as 'Superb cover,' giving a defending unit bonuses for cover etc. Hopefully I'll get it into action in a game before long.

Friday, March 25, 2022

To the Manor Born ~ 5

Another bit done on my slow and unsteady progress to a finished fortified manor model.

The quoins are done, I spackled the edge of the base and added rudimentary battlement walkways to the rear of the walls. The sides of the gatehouse are done, too. The next step will be to finish the groundwork. After that, a spray of black undercoat and it'll be on to the main paint job. Onwards and upwards.


Sunday, March 20, 2022

To the Manor Born ~ 4

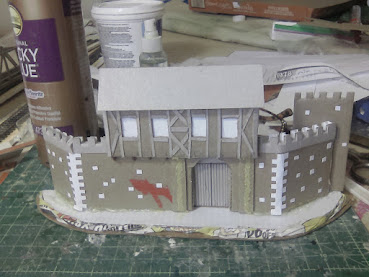
More progress with the manor build. The corbels are in along the underside of the gatehouse. I cut and shaped the base from the same former lawn sign material as the walls are made of. A section of pizza card was glued to the underside ready to take contouring. Thin card is used for the sturdy wooden gates. Iron studs along the planks will be painted or inked in later. The strange red splotch is down to an unattended paint brush rolling onto the model...

Based up, with the walls bent back to shape. I used E6000 adhesive for strength, but it takes time to set. The copious amount of hot glue residue is down to it failing to cool sufficiently in time to hold the plastic in place, necessitating another go-around. The fold in the wall's end and the outline of a squat tower on the right should give the impression of distance.

A bit of paper packing along the edge of the plastic should give a firm base for contouring. I'm thinking of adding a short wooden bridge in front of the gates. Thin white card represents ashlar stonework and covers the cuts in the main walls. Off cuts from making the stonework are glued to the walls in a semi random pattern to suggest individual stones. The faint yellow streaks on the walls beneath the gatehouse represent the rubble fill in the stumps of former gate tower walls.


Next up will be to finish the contouring then an undercoat of black paint.

Thursday, March 17, 2022

To the Manor Born ~ 3

A little more progress on the fortified manor build.

The half-timbered gatehouse is more or less complete. I'm debating whether to leave the windows as-is (glazed) or have them shuttered. 

My take on this build is that the manor was more heavily fortified at one time but the owner's desire for comfort led to certain modifications over the past few years. The gatehouse was rebuilt when a modest tower gave way to more living accommodation. With this update the original gate became offset beneath the structure. I'll add traces of the original tower in the wall.

The roof won't take that much work. I'm thinking of painting the tiles or using a railway modelling print rather than go to the effort of making individual tiles.

A side view showing how narrow the profile is. It won't take up a large footprint on the table. (The sides of the gatehouse will be covered to hide the evidence that I'm making some of this up as I go along!) The perimeter walls either side will be bent back to the same level as the rear of the structure then the whole mounted on a narrow base. I will add some detailing to the front, and may add a tower in outline form to the right hand wall to represent further defences along the wall.

This build is in the final stages. I have another project on the go at the moment, hinted at by the structure to the left of the bottom photo.


Monday, March 14, 2022

To the Manor Born ~ 2

Some progress with the new building project. I have a kind of Stokesay Castle, Shropshire, look in mind. 

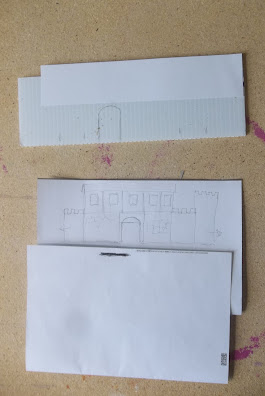
It's taking shape. Behind is the basic sketch I did to show roughly what I'm aiming at.


The crenelations and the gateway are marked out then cut. The half-timbered gatehouse structure-to-be is cut and laid on the wall to check for fit.

It was at this stage I decided to raise the height of the gatehouse roof quite substantially. Another piece of card and foamcore are taped in place while the glue dries. This orange section will be the support for the roof and form the rear of the gatehouse.

On to the half-timbered gatehouse. 2mm strips of cereal box card make the main vertical timbers. For the sake of cutting a corner or two I may draw in the crossbars and other bits. More to come.

Saturday, March 12, 2022

To the Manor Born ~ 1

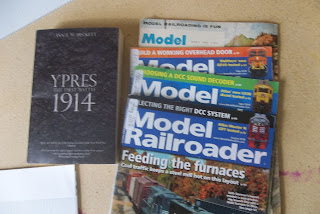
...and some library loot.

If you haven't already seen it, Pete Barfield (aka 'PanzerKaput') has a nice series of posts on building a fortified manor house for Lion Rampant and other medieval era games. This got me thinking about making something similar for my own collection. 

Not having a lot of storage space means I have to condense things a little. I turned for inspiration to the model railway/railroading hobby, where 'flats' and 'semi-flats' is a common method of representing buildings without having them take up large footprints on the layout. In essence the building is shown with only one full size wall, the others are truncated or suggested at.

After flipping through a few railway hobby magazines and looking up a number of YouTube videos I think I have the idea of how to go about making a manor house for the tabletop. It'll be designed to stand on one edge of the tabletop to represent a retinue's sally point.

It's early days so I'm only at the sketch stage at the moment. For construction material I'll use an off cut from a yard sign. For those not in the US these signs are made of corrugated plastic designed to have metal wickets inserted into the corrugations so they stand free in a front yard. They're generally used for yard sales, by realtors, construction contractors/builders and to show political affiliation. It's tough, durable and easily cut. I'm thinking of making the body of the wall and a base out of this stuff, with cardboard for details.

Our local library has its twice-annual books sale this week, so my wife and I scored a few goodies this morning from a well-attended event. The railroad modelling magazines are useful for tips and tricks - even if one dates to 1968! Prof. Ian Beckett's book promises to be a good read on the last Great War battle where the commanders had a chance of conducting open maneuver warfare.

More on the manor project as I find time.

Thursday, July 9, 2020

The Dolmen Done


Work on the dolmen progressed this week, actually helped by the sweltering heat plaguing NW Ohio for the past two weeks. Paint dried quickly, glue set in record time, flock stuck first go. Marvelous!

First off, after the black undercoat had dried I painted the stones successively lighter shades of grey then applied a layer of vinyl adhesive followed up with flock.


Once the flock was stuck firmly I dripped green ink onto it using an eye-dropper, following up by wet brushing it in successively lighter shades of green. The stones also got some green ink treatment in areas which, in real life would be shaded by the rocks to represent moss.


So here it is, the Dolmen is complete and ready to take its place on the wargames table.

Romano-British war leader Gaius Menusius and his entourage contemplate the ancient stones.

Perhaps appealing the ancestors would help rid the land of the Saxon invaders?


Thursday, July 2, 2020

Down Among the Dolmen


Dolmen are found all across Northwestern Europe. Composed of a flat slab of stone set tabletop-fashion on two or more upright stones or megaliths, they're what's left of late Mezolithic/Early Neolithic burials. Once, earth covered the stones to a considerable height to form tumuli, or burial mounds. Time, erosion and ploughing wore down the earth until the stones were exposed once more. They stand as spooky reminders of our prehistoric past.

Like the stone circle/henge I made earlier, I thought a dolmen would liven up the wargaming landscape and be suitable for any period.

First step - the base. One metal cap from an orange juice carton, glued to a roughly-cut card circle. The basic shape of the dolmen rests alongside. The capstone is a flat oval-shaped wood chip glued to three other round pieces cut to length. Top left is an isolated megalith made of another piece of wood chip glued to a fender washer.


Some flocking, again of the trusty dried tea leaves. The dolmen shows another side.


More flocking, this time after the dolmen was glued to the centre of the base using vinyl tile adhesive. I began to apply flocking to the megalith base.


The next step once the adhesive's dry will be a black undercoat.

Sunday, June 28, 2020

Henge and Bracken


I finished this henge model a couple of days ago, but due to technical issues have only been able to post the results now. So, with the vegetation in place, here it is...


The vegetation is made up of pieces of Spanish moss, mostly painted a dark green-brown, along with a couple of clumps of foam and coffee grounds painted a lighter green and dotted with magenta to represent flowering bushes. A little wet brush stipple work created the dandelion patches.

As Fitz-Badger commented, you have to get the scale right. This model works for 10mm and 15mm figures. Anything larger would find it a bit of a squeeze.


Hadafix the Druid gets down and funky in a private ceremony accompanied by his pet adder, Abernathy, a monstrous snake with a sweet disposition.


Watched admiringly by his wife, Sharon, Hadafix's descendant Father Unctuus blesses the pagan sacrificial stone to remove all that primitive ancestral magic rubbish.

Next up will be another scenery project from the Neolithic Era. Stay tuned...

Tuesday, April 28, 2020

A Romano-British villa


All done! It took a while since I'm busy with real life stuff, but it turned out okay, I think.

The building is of its age. The Roman twilight is well advanced. On the ground floor windows the decorative blue louvred shutters have been replaced by utilitarian heavy versions which can be barred from the inside. The rear door has also been replaced by heavy boards. The inhabitants are sticking to their home - for now. They're worried because they hear of the Saxon raiders striking ever deeper into their homeland and fear they will be next. The local priest, Father Superfluous, visits to persuade them to stand their ground.


I made the ground effect using vinyl tile adhesive with dried baked tea leaves pressed into it, working in small sections at a time to prevent warping. Once the stuff had dried I gave it a light going over with a spray bottle filled with diluted green ink. Some of it got on the walls of the building, but it looked like the type of natural slime-mold that grows on such old plastered surfaces so I left it. Whilst it was all wet I used an eye dropper to drip green paint on the ground surface, which spread to cover most of it. once the whole base coat dried I gave it a going over with a wet brush of light green. 

Thursday, April 23, 2020

Villa build - almost done


Yikes! It's been a while since I posted last. Isolation has proven beneficial in some respects since I was able to sit, put fingers on keyboard, and write a new novel manuscript while waiting for edits from my publishers. In between times, while musing on plot points and having to take wife-induced daily walks for exercise (mutter grumble waste of time only not really preventative maintenance blah blah blah) I got more work done to the late Romano-British villa.


Like a lot of Roman buildings at the tail end of the Empire's life, the place has been patched up from time to time. The roof on one wing was damaged and needed repair. With most of the major British tile works no longer operational or lost to invading Saxons the villa's inhabitants resorted to thatch, using salvaged tiles for other repair jobs on the remaining tiled roofs.

Heavy shutters are the next stage of the project, followed by the ground work. I'll used tile/carpet adhesive for this since it tends not to shrink too much which causes warping to the base. Paints - I use craft paints throughout. The classic Roman pantiles were made using thin strips of card washed with a thin coat of spackle. The colour is a basic terracotta, followed by increasingly lighter shades of terracotta mixed with yellow, a wash of dark brown then highlights of yellow-orange. The thatch is a hideous mix of tissue paper, spackle and PVA mixed with a bit of brown craft paint, highlighted with magnolia shade then given a light sponging over with dark brown wash on the lower parts of the roof. Oddly enough, I thought this thatched section would give more trouble, but it was the easiest part of the roof to paint. Ho hum.

Monday, April 13, 2020

Villa build update


More work on the Romano-British villa for Dux Britanniarum. The covered porch and most of the wooden beams (cartridge paper) are in place. 

The space between the two wings is wide enough for a figure sabot to stand in.
 

I'll probably make the classic pantile roofs from thin strips of card overlaid with tissue paper.

Thursday, April 9, 2020

Distractions and Diversions


This lock-down malarkey isn't quite what it was cracked up to be. I find myself busier than ever, due to working on a manuscript, and the beginning of gardening season, plus my wife insists we take a walk every day. I see the point of walking and regard it as 'essential maintenance,' but it's a bit of a chore...

With my wargamer's butterfly attention span I'm also easily distracted. A case in point, I began work on a late Roman villa for Dux Britanniarum.


This won't be anything on the scale of the villa complexes at Cirencester or Turkdean. It's more along the lines of the small villa at Abermagwr in Wales, which was occupied until at least the late Roman period. It's the home of a Romanised British family of some means who've had to repair and rebuild their abode to a lesser standard than their forebears. Perhaps they've also taken some defensive measures against the Saxon raiders roaming the land. The Abermagwr villa is thought to have had an interesting half-timbered construction so I'll go with that.

Much like my previous model of an early church, the building's carcass is made of trusty pizza box card, hot-glued into place with interior cross-bracing of more card to stiffen it. 

Aside from this, I will try out the Quickfire rules using battleship vs. battleship to see how they work. 

Majestics vs Kaiser Freidrichs. It'll all end in tears for somebody.

Saturday, September 21, 2019

More Autumn trees


Autumn: The season of mists and mellow fruitfulness is right. An inordinate amount of my free time has gone towards processing the hundreds of tomatoes our garden produced this year. Home made soup, ketchup, veggie stock - you name it, we're making it. Thankfully we're coming to the end of the harvest. The next phase will be making green tomato chutney from the fruit that won't ripen once the weather turns colder.*

Anyway...

I found a few minutes here and there to expand the number of Autumn trees using the homemade flock. The latest batch is shown below.


The photo's not that great, but it does the job. I'm thinking of making one or two small hills or rocky outcrops with a number of the smaller trees growing on them.

With that done I think I'll take a break from the sands and relentless heat of the Sudan and return to Early Medieval England's green and war-torn land for my Dux Britanniarum campaign.The previous game was played in December, so Saxon Lord Ebba and Romano-British Lord Gaius Uselessness - sorry, Menusius - are due for a revisit.

In campaign terms it's now July 472AD. Ebba has acquired enough loot to attempt the conquest of a province. He's confident after inflicting two serious defeats on his enemy, but for the Romano-British, the third time may be the charm...


* Recipes available upon request!

Friday, September 13, 2019

Autumn trees


My experiment with homemade foam flock worked - after a fashion. I found that with this stuff, a lot goes a little way. The coverage was good, but nowhere near as much as I'd hoped. Still, the result isn't too shabby.


Apart from a few touches of orange and yellow I left the foam in its natural colour. I mounted the trees on one of a batch of old hip-hop CDs I found, using hot glue. The CD I then glued to a slightly larger and irregularly shaped piece of card. A paper-mache mix of spackle/filler, tissue paper and chocolate brown craft paint went on next, spread over and around the tree roots and trunks. Whilst it was still wet I applied a few patches of dried used tea leaves to represent deep drifts of brown leaves. When everything had dried, I painted it a mid green, followed by a lighter green wet-brush then a even lighter yellow dry brush. Since I still have a lot of foam to hand, I'll add a few more to the stock over the next few weeks.

My next project will likely be a circle of standing stones to add a bit of ancient mystery to the Early Medieval English landscape. Another hip hop CD will go towards a better cause...

Sunday, September 16, 2018

All wips* together


A peaceful Sunday morning was spent cleaning up the Saxon Dux B force and intermittently frowning at the 1/2400 Majestic class battleships.

Splintered Light Miniatures produce lovely clean, crisp castings so I had very little flash to remove. Once done I popped them in hot water with a few drops of detergent and vinegar to clean off my sticky fingerprints and any casting powder residue.

I'm frowning at the ship models because during the week the dark grey undercoat dried enough - at last - for me to give them a top coat of light grey. Now I have the same problem with the top coat of paint failing to dry completely even though it's been three days since I sprayed them. We are having a spell of humid weather again, so I suppose I'll have to wait another day or so for the stuff to dry. A bit frustrating, but I'll manage.

The time has come, the Walrus said, to speak of many things, of Saxons, Ships and Painting Blocks, and trash-filled worktop scenes.

*Writer-speak for works in progress. Exciting, eh?

Wednesday, September 12, 2018

Battleship Row & Saxon Shinies


Construction of the Majestic-class battleships is finished, and I got a primer coat on them using Rustoleum grey. The weather has turned cooler and damper, so although I sprayed the models a couple of days ago the paint is still wet in parts. All very annoying. Still, they look okay.


They took a bit of cleaning up beforehand. Although the silicone works as a molding material, it starts to degrade after about the fifth casting, so I'm going to limit all future casts to that number of ships or fewer.

Much rejoicing followed when the early Saxons marched in this afternoon. I ordered the starter army plus a pack of Romano-British archers from Splintered Light Miniatures. They were mailed yesterday afternoon and arrived within 24 hours. Excellent work by the USPS!


I ordered a batch of archers, as reinforcements can reach the warlords or be hired by them over the course of a Dux B campaign, and archers/skirmishers are first on the table of extras in the rules.

So, I'm going to be busy for the next week or so painting Dux B figures as well as working up opposing forces for the pre-Dreadnought games. It's one of those times when projects seem to take ages to come together then everything happens at once. Them's the breaks...

Saturday, April 28, 2018

Cart convoy


And so they're finished. A trio of carts ready for service with either the Romano-British or Saxon invaders.

The carts pass by a small settlement. The local priest emerges to bless them on their journey.
Following tradition an excited small boy runs alongside, with his mother yelling at him to be careful around those lumbering oxen.
They were a fun little project to work on, and it's satisfying to see them on the table at last, although I doubt the Fabled Perry Twins have much to fear from my sculpting skills. Next time I'll be scaling up a bit to 1:1 scale when I tackle the folding table project.

Wednesday, April 25, 2018

And the cart project keeps rolling along...


By fits and starts, anyway. Work's been busy lately, plus I'm painting wooden latticework for a garden fence - which is a lot less exciting than it sounds. Still, I have made progress on the carts. The drivers are done and the bases are now underway.

Ieremius Clarksonius, Centurion Slowimus and Hamstericus wait impatiently for the course to be laid. No sign yet of Stigimus Maximus.

I did think of using plastic card for the bases, but James Wappel happened to be working on a road-making project which used wood filler. As he points out it doesn't shrink and can be worked easily. I have some wood filler handy so gave it a try using rectangles of basswood, and it works just fine.

I'm a bit further along than the photo above, but it's late and I'm pie-eyed from painting latticework, so I'll delay putting the anything more up until I have finished the lot.


home page uniques