Showing posts with label modelling. Show all posts

Saturday, March 12, 2022

To the Manor Born ~ 1

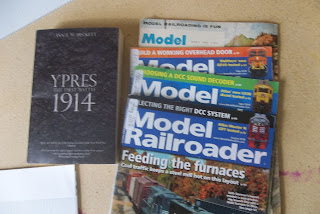
...and some library loot.

If you haven't already seen it, Pete Barfield (aka 'PanzerKaput') has a nice series of posts on building a fortified manor house for Lion Rampant and other medieval era games. This got me thinking about making something similar for my own collection. 

Not having a lot of storage space means I have to condense things a little. I turned for inspiration to the model railway/railroading hobby, where 'flats' and 'semi-flats' is a common method of representing buildings without having them take up large footprints on the layout. In essence the building is shown with only one full size wall, the others are truncated or suggested at.

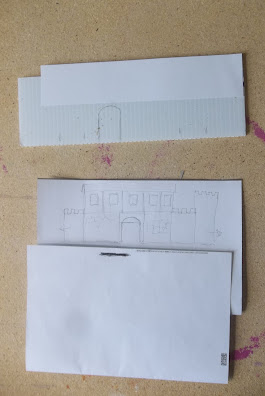
After flipping through a few railway hobby magazines and looking up a number of YouTube videos I think I have the idea of how to go about making a manor house for the tabletop. It'll be designed to stand on one edge of the tabletop to represent a retinue's sally point.

It's early days so I'm only at the sketch stage at the moment. For construction material I'll use an off cut from a yard sign. For those not in the US these signs are made of corrugated plastic designed to have metal wickets inserted into the corrugations so they stand free in a front yard. They're generally used for yard sales, by realtors, construction contractors/builders and to show political affiliation. It's tough, durable and easily cut. I'm thinking of making the body of the wall and a base out of this stuff, with cardboard for details.

Our local library has its twice-annual books sale this week, so my wife and I scored a few goodies this morning from a well-attended event. The railroad modelling magazines are useful for tips and tricks - even if one dates to 1968! Prof. Ian Beckett's book promises to be a good read on the last Great War battle where the commanders had a chance of conducting open maneuver warfare.

More on the manor project as I find time.
Thursday, July 23, 2020

A Clutch of Cressy-class Cruisers


Try saying that six times quickly.

I haven't posted for a while because my wife and I are dealing with the aftermath of a car accident. Nobody got hurt, but our car got a right ding which rendered it inoperable for the time being. Negotiating with the insurance agencies is a long, time-consuming bloody nightmare, even though we were totally blameless for the collision.

Anyway...

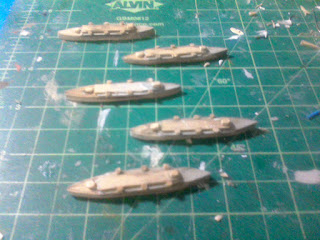
In the little downtime I had I got to work on the much-needed Royal Navy armoured cruisers. These are the six-hull Cressy-class, ordered in 1898 and at the time the first major cruiser class built for the Royal Navy in fifteen years. Progenitors of subsequent vessels of their type, the first of the class was completed in 1902.

Like the other models I've built they're fairly basic. Here's the six undercoated and ready for the final paintwork, which I hope to do sometime in the next few days.


After these are doing I'll probably build the five London-class battleships which were assigned to the Mediterranean fleet.

Thursday, July 2, 2020

Down Among the Dolmen


Dolmen are found all across Northwestern Europe. Composed of a flat slab of stone set tabletop-fashion on two or more upright stones or megaliths, they're what's left of late Mezolithic/Early Neolithic burials. Once, earth covered the stones to a considerable height to form tumuli, or burial mounds. Time, erosion and ploughing wore down the earth until the stones were exposed once more. They stand as spooky reminders of our prehistoric past.

Like the stone circle/henge I made earlier, I thought a dolmen would liven up the wargaming landscape and be suitable for any period.

First step - the base. One metal cap from an orange juice carton, glued to a roughly-cut card circle. The basic shape of the dolmen rests alongside. The capstone is a flat oval-shaped wood chip glued to three other round pieces cut to length. Top left is an isolated megalith made of another piece of wood chip glued to a fender washer.


Some flocking, again of the trusty dried tea leaves. The dolmen shows another side.


More flocking, this time after the dolmen was glued to the centre of the base using vinyl tile adhesive. I began to apply flocking to the megalith base.


The next step once the adhesive's dry will be a black undercoat.

Sunday, June 28, 2020

Henge and Bracken


I finished this henge model a couple of days ago, but due to technical issues have only been able to post the results now. So, with the vegetation in place, here it is...


The vegetation is made up of pieces of Spanish moss, mostly painted a dark green-brown, along with a couple of clumps of foam and coffee grounds painted a lighter green and dotted with magenta to represent flowering bushes. A little wet brush stipple work created the dandelion patches.

As Fitz-Badger commented, you have to get the scale right. This model works for 10mm and 15mm figures. Anything larger would find it a bit of a squeeze.


Hadafix the Druid gets down and funky in a private ceremony accompanied by his pet adder, Abernathy, a monstrous snake with a sweet disposition.


Watched admiringly by his wife, Sharon, Hadafix's descendant Father Unctuus blesses the pagan sacrificial stone to remove all that primitive ancestral magic rubbish.

Next up will be another scenery project from the Neolithic Era. Stay tuned...

Wednesday, June 24, 2020

Flocking on the Henge


More progress on the henge terrain piece...

I currently use a carpet and sheet vinyl adhesive to fix flock to models. PVA would work just as well, but since the adhesive's a leftover pot from another job it's what I'm using. I began at the middle of the terrain piece around the sacrificial slab and spread the gunk outwards using a coffee stirrer, making sure the stuff lapped up to the base of the stones and not on to them.


Once the whole base was covered I gave it a good deep dosing of dried used tea leaves. The adhesive is really tacky, but it pays to press the flocking/tea leaves gently down into it to ensure it all sticks. I left it overnight then shook off the excess material. Here's what it looked like at this stage. The tea leaf brown will add depth and the impression of soil beneath the grass. 


The next step is to get some greenery down.


A light wet brush of 'parakeet green' applied whilst the flock is still damp picks out the grass.


The next step will be to apply a little dark green to the stones and dot some larger vegetation about.

Tuesday, June 23, 2020

I see a Wood Henge and I wanna paint it...


...grey.

(With apologies to the Rolling Stones)

The undercoat is all dry, so now it's on to the next stage - dry brushing in successively lighter shades of grey.


I'm concentrating on the 'stones' since the ground around them will be covered by flock. You can see how the brushwork brings out the grain in the wood, making it look like weathered stone. I think at this point I'll stop dry brushing since the stones are light enough. The next step will be the ground work, specifically the grass and vegetation growing up in and around the stones.I'll probably add splotches of green in various shades to the stones to represent lichen, moss, etc.

Monday, June 22, 2020

Zen and the Art of Henge Building


One thing I discovered from my terrain making projects for the tabletop is how wood chip looks very much like stone in the smaller scales. My wife and I recently had a ton of wood chip delivered to use in our garden, so I selected a few likely small pieces from the heap for my next modelling project - a henge for the Dux Britanniarum tabletop.

Henges date from the Neolithic/Early Bronze Age, and are dotted throughout the British Isles. Technically from the archaeological point of view a henge is a space located within a ditch which is itself enclosed by an earthen bank. Stone circles - even mighty Stonehenge - are a different beast, but the term has stuck, so...

As a gaming terrain piece they can therefore appear on any tabletop battlefield set in Britain during any era from the Neolithic on. My aim is to make a small-ish site like those of Arbor Low Henge in Derbyshire or Scorhill on Dartmoor in Devon. I'm in two minds whether to make the outer ditch and bank as the piece will then have a larger footprint on the tabletop. We'll see.

I started with this handful of suspicious-looking brown objects...


Using a mitre box and razor saw I cut them in half, before making the base for the henge. The core of the base is an old CD which I sandwiched between two layers of cereal card, bending the card down around the edges to make a low mound. The cut pieces of wood stand in the background.


Once the card was glued tight on the CD I arranged the wood pieces in a suitable henge configuration and fixed them in place. I decided not to make any trilithon ('table') pieces for the sake of simplicity and robustness. They tend not to feature in the smaller henge sites anyway. The shadows the pieces cast already make them look like the upright stones and sacrificial slab of a small stone henge. I'm on the right track...


The next step was to spread a little spackle around the base and 'stones,' leaving some patches bare. These will be areas of lower ground within the circle when the top layer is done.


Suitably spackled, the piece awaits the undercoat. More to follow...

Sunday, June 21, 2020

Kaiser class completed


Finally, the quintet of Kaiser class battleships is complete. The last wash is on, the wakes are done, and the name tags are in place.

Wakes and washes done.


From left to right, Kaiser Wilhelm der Grosse, Kaiser Wilhelm II, Kaiser Friedrich III, Kaiser Karl der Grosse, Kaiser Barbarossa.


Bringing up the rear, the three merchantmen. I deliberately left them unnamed so they can work for all nationalities.

I'm generally pleased with the way these turned out. Technically the Kaisers are a little higher out the water than they would've been in their heyday. Ironically from 1906 onwards - the period I'm gaming - the class underwent an extensive refit which saw the removal of a number of secondary weapons, a great deal of superstructure, and the replacement of the distinctive tubular masts with more conventional pole masts. The reduction in weight left them riding higher in the water, resulting in their armoured belt being too high to be effective. The class was then relegated to second line use then barracks or training ships during WW1 before being scrapped. I'm hoping they'll see plenty of action in this incarnation.

Wednesday, June 17, 2020

Kaiser-class: Battleship row


For one reason and another I haven't had much time to spare lately, but I did get some paint on the new 1/2400 Kaiser-class pre-Dreadnoughts and the trio of merchant ships.

Five little battleships, all in a row. The orange object in the background is part of an upcoming project.

It doesn't show so much in the light, but the battleships have had a wash of black paint. Next step will be to put them on transparent bases and add name tags. After that they'll join the fleet.

The merchant ships will follow. Why do civilian trading vessels have such boring hull colours? It's probably due to costs, but they do look drab. I'll see what I can do with funnel colours, and maybe a cheeky band of bright colour around their scuppers.

Thursday, June 11, 2020

Kaisers ~ getting there


Here's a photo showing a little more progress I've made on the five Kaiser-class German pre-Dreadnought battleships. I almost forgot the distinctive boat cranes these vessels had, but a few snipped-down staples and Superglue did the trick. A good coat of black on the battleships and the three generic merchantmen followed. Now they all await the next stage of painting.


Once these are off to join the fleet, I'll make four British armoured cruisers, and probably a few more British battleships - possibly the three Irresistable-class - to maintain the Royal Navy's numerical superiority.

Monday, June 8, 2020

Kaiser-class progress.


For some technical reason a photo I took of work-in-progress on these 1/2400 battleship models vanished into the ether, never to return. I uploaded another and it seems to have stayed around. Things have moved on a bit since this was taken. Apart from a bit of fiddly work to the foremasts construction is finished and it'll be on to the paintwork.


Tuesday, June 2, 2020

A Quintet of Kaisers


On to more 1/2400 ship models. A little research threw up the fact the five German Kaiser Friedrich III-class pre-Dreadnoughts were intended to be part of a strike force which, in the event of a war with England, would attack the East Coast of Britain, cover an invasion force and engage in general operations in the North Sea. They were lightly armed for their size - four 9.4" guns compared to four 12" guns on comparable British battleships. They did however carry eighteen 5.9" secondary guns compared to the twelve 6" guns carried aboard most RN vessels of their size.


The current batch. Lurking just astern of the topmost battleship hull is another coastal merchantman I put together.

Currently I have the five basic hulls cut and shaped using the traditional sandwich method. I'll build up the superstructure with card as I don't want them to be too tall for the scale. Once finished they should look something like this...


The class were named after Kaisers Friedrich III (name ship), Wilhelm II, Wilhelm der Grosse, Karl der Grosse, and Barbarossa. In the event they never fired a shot in anger, being relegated to coastal protection duties during the early years of the First World War before being laid up as barrack ships. Once I've completed these I'll move on to four British armoured cruisers then - fates be willing - I'll work out the campaign.


Sunday, May 31, 2020

Of Tear Gas and Merchantmen


“My last waking thought, I remember, was that, while this was a hell of a thing to have happened to a respectable old gentleman in his declining years, it was all pretty darned interesting and that I could hardly wait to see what the morrow would bring forth.” ~ P G Wodehouse.

While I may not qualify for old, nor have I quite reached my declining years, I do hope I qualify as a respectable gentleman. Yesterday was, however, pretty darned interesting.

Normally I'll seldom touch on real life matters here on a hobby blog. This is an exception. I was asked to cover a protest rally outside the police HQ here in downtown Toledo. A lot of impassioned speeches were made in relation to the recent unpleasantness in Minneapolis and nationally in general. Three police drones buzzed above the crowd and a quartet of officers observed from the precinct house rooftop, but other than that the police presence was light. After two hours the crowd of around 1,500 moved off to march around the block. The marchers reached an intersection where they were to turn, only to be greeted by armed and armoured police - who promptly opened fire with tear gas and baton rounds.

Marchers fleeing the scene.

I was talking to a marcher some way back, and even so we caught a whiff of the gas. It's not a nice experience. My eyes stung, and although I wore a mask against COVID-19, of course it's no protection against gas. I still have a sore throat this morning. Several people were overcome by the gas, which drifted downwind into an area of apartment blocks. One young woman marcher was shot in the back of the head by a 'knee knocker' round whilst giving first aid, her wound requiring ten stitches. Whatever the rights and wrongs of the arguments on both sides, it was a gross over-reaction by the police to a hitherto peaceful protest. Shame on you, Toledo PD!

* * * *

On to the merchant ships...

Whilst I plan to scratch-build four 1/2400 scale German battleships and four British armoured cruisers, I thought a few merchantmen of one kind or another would be useful. Here's what I have so far, and I'll build at least a couple more.


They represent a couple of bulk carriers, one a seagoing or coastal vessel, the other a larger ocean-going ship. I kept them generic so they can serve any side in naval conflict. There's another useful aspect to these. Although guerre de course warfare - privateering - was banned by the Declaration of Paris in 1856, a form of it was reinstated in the Hague Convention of 1907, where privately-owned ships manned by naval personnel could attack merchant shipping of a belligerent power. Since this agreement comes at the same period as my hypothetical war between Britain and Germany, it opens another aspect for a campaign.

Tuesday, May 19, 2020

Butter market built


So here we have it - one butter market/market cross.


I initially painted it grey to match the church, but found it looked too drab. Mixing up a light mustard-colour I repainted it to look like Collyweston stone, a variety of stone found in the British Midlands which varies in colour from pale grey-beige to honey-yellow. The grey paving slabs on the base were drawn on using a sharp-ish pencil.

Of course, now I have a market cross, I need a market place to go with it. I'm thinking of using a section of roofing shingle coated with vinyl adhesive then painted. Not sure if it'll work or not, but I'll give it a go.

In other news, I find I'm horribly tempted to get into yet another field of gaming - WW1 Mesopotamia. The question I ask myself is - do I need another period with troops in pith helmets supported by river gunboats?

Friday, May 15, 2020

A bit of a butter market project


Having finished the church steeple I found myself assembling what buildings I have for the ECW period to see what it all looks like, and thinking the small community lacked something. Most old British settlements have a market place, which features or featured a market cross or a structure sometimes referred to as a butter or corn market. Having a few hours to spare due to rainy weather closing down gardening for a week or so, I thought I'd bung a few Hirst Arts plaster bits together to make a butter market structure. Again, it's in the Gothic style, and for the sake of the narrative was probably build around the same time as the village church.

Here's what I have so far...


The two-step platform for the building is made of metal discs taken from orange juice and Pilsbury dough containers, covered by cereal card and edged with strips of cardstock paper. Hirst Arts components make up the roof and supports, and the pyramidal roof is more cereal card. I'll add a cross to the roof pinnacle like the one on the church steeple. 

Next step will be to paint everything which will be inaccessible once it's all glued everything together then assemble it.

Saturday, May 9, 2020

A Steeple learning curve


Not being in the mind for gaming lately I revisited an old scenery project instead. This N-scale/10mm English church model is a few years old now. It's built from Hirst Arts plaster components and the Gothic style means it can appear in any period from the late 12th century right up to modern times. It has a relatively small footprint to take up less space on the tabletop, but is quite tall to make it seem to fill more space than it does. I always intended it to be changeable to a degree so as to increase its use, so I made the top of the tower configurable. It can be plain flat, have a cupola or - now, a steeple.

Flat

Cupola

Steeple-to-be

The steeple is 3 3/4" tall and made from four isosceles triangles cut from cereal packet card mounted on a square plaster base to give it a bit of heft. Some steeples are octagonal, but that's a little bit too complicated a job for me to want to tackle at the moment. Maybe in future. The sides are marked with a fine Sharpie pen. I'm going to add thin strips of paper to the vertical edges then paint the steeple a neutral mid grey colour so it could be wood like early steeples, or tiles or slate, and the black stripes should show through to give the impression of rows of slates, tiles, planks, etc.

Monday, September 3, 2018

Making a battleship mold


The long Labor Day weekend gave me the chance to work on the next step of the nascent fleet -  creating a silicone mold. The Majestic master model is the first - and so far the only one - to go through the process. A technical hitch in the shape of a broken glue gun prevented me from doing the others.

Still, here's what I have so far...

To start with I coated the master model in diluted PVA to seal the wood and close off any tiny gaps and cracks between the layers. Since PVA this thin is near colourless when it dries, I put a drop of paint in it to show where I'd covered or missed bits.

Silicone caulking is viscous stuff, especially as it gets older. I advise using disposable gloves when handling it as it will stick to everything that isn't wet. Water will stop the setting process so keep the work area free of anything wet while working with the stuff, and wait until any paint/glue/whatever is dried on the master model before using the silicone.

Once dried, I glued the model to a rectangle of foam core. The sides and ends are cut out to enclose the model with about a quarter inch to spare all round.


To make sure all the undercuts and overhangs are filled I worked the silicone into them using a coffee stirrer. It's kind of like applying fondant or icing to a cake.


I then assembled the coffer around it using a hot glue gun. Quick and easy.

Majestic nestling within its box, awaiting the rest of the silicone. A host of destroyers lurk in the background.
Not long after I took this photo the brand-new glue gun decided to break under the moderate strain imposed by doing its job, so it's back to the store with it. The good part about the process is fresh silicone will happily stick to itself even when the first layer is dry, so I can pick up where I left off without problems.

Thursday, August 23, 2018

Moldable Majestic


A little more progress today on the Majestic class battleship in 1/2400 scale.


The process of making these ship models has been described as the 'sandwich method,' but I think it's more like a making layer cake, with each level built up to form the whole. Like any model this size it's not what to include that matters, but what to leave out. Some prototypical details are so small they won't be noticed or are near impossible to scratch build.

So far I have the hull, the two teardrop-shape main turrets and most of the upper works done. I've yet to work out how to represent the 6-inch secondary armament casements which took the form of hemispherical bulges along the top of the hull. I'll probably use Miliput to sculpt these. Part of the aft upperwork has also been left out since on the prototype the mizzen mast passed through it and the masts will have to be fitted separately in any case. I've also left out the main armament since these will be too thin to cast in resin. Instead I'll fit them later using cut-down pins or wire.

I'm going to use a method of making a mold from silicone caulking, which works out cheaper for a small scale limited-run project like this than OOMOO 30 or similar. I've avoided making too many deep undercuts on the model, although silicone caulking is surprisingly good at rendering these.

One of the most noticeable variations between this ship and others like her lies in the funnel arrangement. Majestic and her sisters had two funnels mounted side by side. Sometimes the arrangement was slightly different from ship to ship. Quite often as new and improved boiler systems came into being ships were refitted to mount a tandem pair. The Majestic's near twin Mikasa was one such. For this reason I've not modelled the funnels, leaving the basic form to give maximum scope for this kind of variation. The same goes for the ship's boats, which had a variety of positions.

Next up will be a Cressy class Armoured Cruiser.

Sunday, June 10, 2018

Monitor - almost there


Real life got in the way a bit this past week, but I managed to make a little more progress on the Monitor. First up, I made a coffer out of scrap wood to hold the deck house in place and painted the guns and turret gun ports flat black.


Seen head-on the guns have given it a menacing aspect, like it's looking for trouble. The only other bits and pieces I've done to date are the navigation lanterns - port, starboard and masthead. These are plaster components from the Hirst Arts inn accessories mold. I did hope my inks would turn up, but no joy, so I used Testors enamels to make the coloured glass for the lanterns. I also fitted a short length of tubing to take the flag.


I'm going to work on a Congo Free State flag to fly from the upper deck then give the mast some rigging. Once that's all done I'll take some photos of the finished vessel.

Monday, June 4, 2018

Monitor - slow but steady


A busy weekend for me and my Better Half, but I found some time to work on the monitor. The bulk of construction is now done and dusted. All that's left are the twiddly bits for the upper deck - smokestack, mast and skylight.

For the railings I use the plastic mesh found in craft shops. I think it's used for embroidery. It's cheap, easy to cut, and works well for modelling purposes. It is quite flexible and in my experience doesn't take ordinary acrylic paints well, so in this case I sprayed it with Krylon flat white which works nicely. Six lengths of mini-dowel make the posts. The only other addition to the deck house so far is to paint the conning tower vision slot black.


The railings are now glued on with E6000 adhesive, again because it works with this kind of plastic. The currently empty stretch of deck either side of the conning tower will mount navigation lights once I get around to casting them.


Bits to be sprayed white - The bamboo kebab skewer and mini-dowel mast, component parts of the skylight, and the smokestack. I lightly sanded the exterior of the smokestack to prep it for the spray paint, and painted the inside sooty black. The skylight is more plastic mesh, with wood filler spread across it to fill the square holes leaving the mesh surface proud.


Once the paint dried on the skylight, I painted the piece light blue to represent glass then went over the raised grid work with white for the window frames. Once dry I gave the glass a coat of gloss varnish I think it came out okay.


Next I'll rig the mast and glue a short length of tube to the stern railing on the upper deck to take an interchangeable flagpole. That way I can swap out the vessel's nationality when needed. At the moment I'm debating whether to make the whole deck house assembly removable for ease of storage/transport. I have a couple of small bar magnets left, or I can make a rectangular coffer for the deck house to sit over. We'll see.


home page uniques